10 Practical Open Kitchen Partition Ideas and Budget-Friendly Tricks
]Look, I get it. You tore down that wall between your kitchen and living room thinking you’d create this gorgeous, Instagram-worthy open-concept space.
And now? Now you’re standing there watching cooking smoke drift into your living room, listening to your blender rudely interrupt movie night, and wondering if maybe—just maybe—you made a tiny mistake.
Don’t worry. You’re not alone, and you definitely don’t need to rebuild that wall.
I’ve spent the last three years obsessing over open kitchen designs after my own renovation left me with similar regrets.
The good news? There’s a whole world of clever partition solutions that give you the best of both worlds: that airy, connected feeling plus actual separation when you need it. And honestly, some of these options look way better than a boring old wall ever could.
So grab your coffee (or wine—no judgment here), and let’s walk through ten practical partition ideas that won’t destroy your budget or your sanity.
Glass and Metal Frame Partition
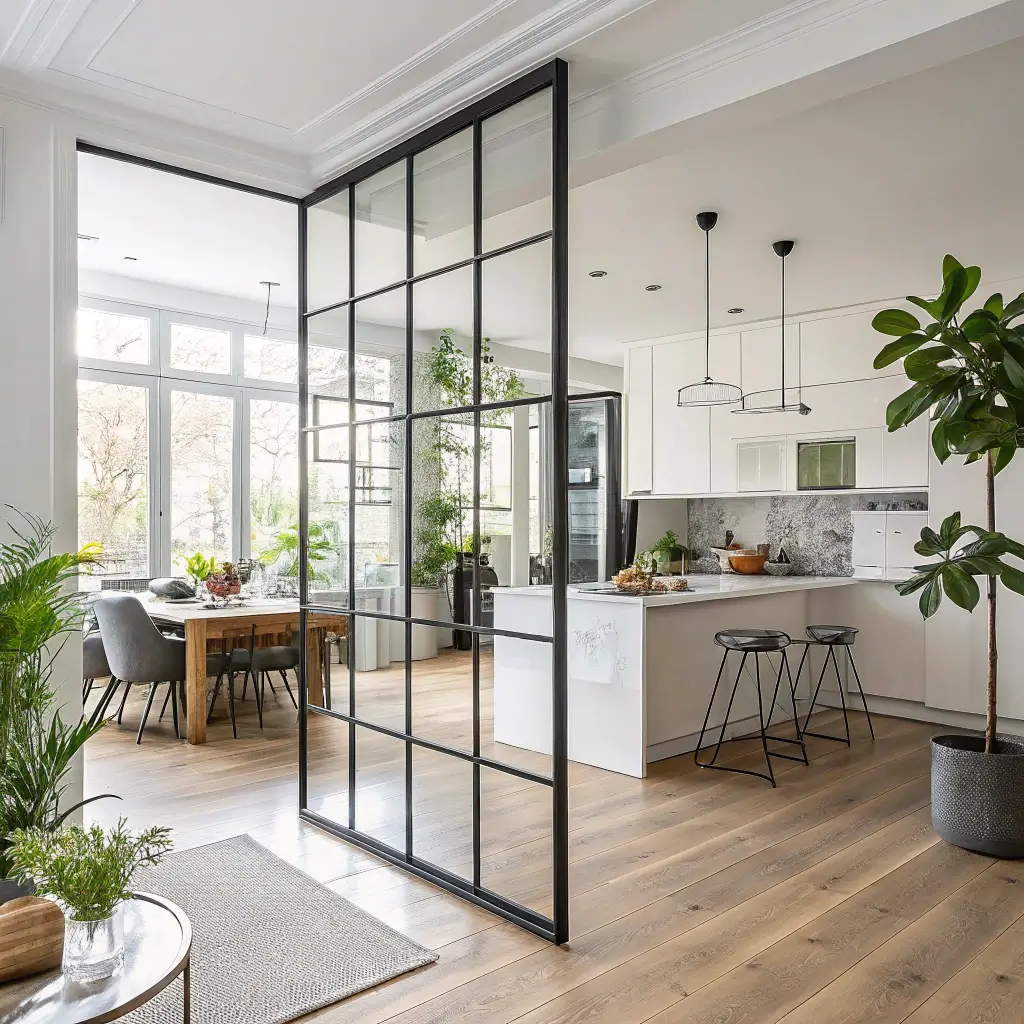
Let’s kick things off with what I consider the MVP of kitchen partitions. Glass and metal frame partitions have absolutely exploded in popularity, and honestly? The hype is deserved.
Why Glass Works So Well
Here’s the thing about glass partitions—they solve your problems without creating new ones. You get physical separation between your cooking chaos and living space while maintaining that visual connection you originally wanted. Light flows through freely, your space still feels massive, and you can actually contain those cooking odors.
The metal frame adds structural integrity and that industrial-chic aesthetic that looks fantastic in almost any home style. Black steel frames give you that trendy Parisian apartment vibe, while brass or gold tones work beautifully in more traditional spaces.
Budget-Friendly Glass Partition Tricks
Now, custom glass partitions can get pricey—we’re talking anywhere from $500 to $3,000 depending on size and complexity. But here’s how I saved serious cash on mine:
- Use standard-sized glass panels instead of custom cuts
- Source metal frames separately from local welders or fabricators
- Consider tempered glass shower panels—they’re cheaper and already safety-rated
- Install it yourself if you’re handy (it’s honestly not that complicated)
- Opt for partial height rather than floor-to-ceiling to reduce material costs
I found my frame materials at a local metal supplier for about $150, added tempered glass panels from a discount building supply store, and installed the whole thing myself. Total cost? Under $400. Not bad for something that looks like it belongs in an architecture magazine.
Practical Considerations
One thing nobody tells you: glass shows fingerprints like nobody’s business. If you have kids or pets, you’ll become intimately familiar with glass cleaner. IMO, the aesthetic payoff is worth the maintenance, but consider textured or frosted glass if you’re not into constant cleaning.
Floating Shelves Divider

Ever wondered how some people create separation without actually blocking anything? Floating shelves might be your answer, and they’re probably the most budget-friendly option on this list.
The Double-Duty Advantage
What I love about floating shelf dividers is that they’re not just partitions—they’re functional storage that earns its keep. You’re getting visual separation plus a place to display cookbooks, plants, pretty dishes, or that collection of fancy olive oils you keep buying but barely use.
The open-back design means light still travels through, and you maintain sightlines across your space. It’s separation without isolation, if that makes sense.
Building Your Own Shelf Divider
Here’s how I’d approach this project on a budget:
Materials you’ll need:
- Sturdy wooden boards (reclaimed wood looks amazing and often costs less)
- Heavy-duty floating shelf brackets
- A solid mounting system—this is crucial since free-standing shelf dividers need proper anchoring
- Stain or paint to match your aesthetic
Pro tips for success:
- Stagger your shelf heights for visual interest
- Mix closed storage boxes with open shelving to hide the ugly stuff
- Leave breathing room between shelves—cramped shelving defeats the purpose
- Anchor properly into studs or use appropriate wall anchors
The whole setup can cost as little as $100-$300 if you’re willing to hunt for materials and do the installation yourself.
Styling Your Shelf Divider
Don’t overthink the styling. The best-looking shelf dividers follow the rule of threes—group items in odd numbers, mix heights and textures, and leave some empty space. Nobody wants to look at a cluttered shelf wall.
Half Wall with Countertop
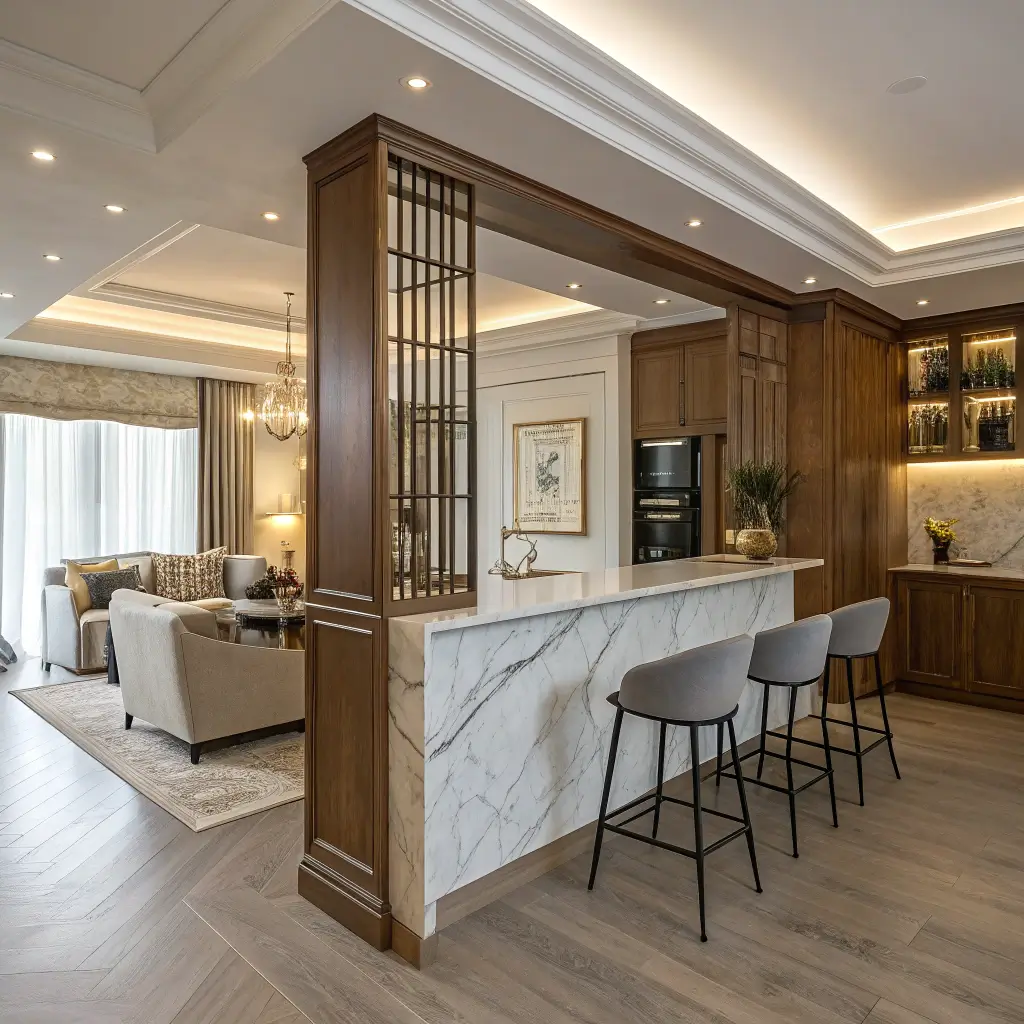
Sometimes the classics just work, you know? The half wall with countertop partition has been around forever because it genuinely solves multiple problems at once.
More Than Just a Divider
A half wall (typically 36-42 inches tall) with a countertop extension gives you:
- Extra prep space when cooking gets chaotic
- Casual dining area for quick breakfasts or keeping guests company
- Visual barrier that hides dirty dishes and cooking mess
- Electrical outlet placement for countertop appliances
Seriously, the ability to hide a sink full of dishes from living room view is worth its weight in gold. Your guests don’t need to see that chaos.
Construction Approaches and Costs
You’ve got options here depending on your skill level and budget:
DIY Route ($200-$500):
- Frame with 2×4 lumber
- Cover with drywall
- Add a countertop (butcher block is affordable and gorgeous)
- Finish with trim and paint
Semi-Professional ($500-$1,500):
- Hire a handyman for the framing
- Install countertop yourself
- Consider adding storage cabinets underneath
Full Professional ($1,500-$4,000):
- Custom design matching existing cabinetry
- Professional installation with permits if needed
- Integrated features like outlets and plumbing
FYI, if you’re going the DIY route, butcher block countertops from big box stores run about $150-$300 and look incredibly high-end when properly sealed.
Design Variations
Don’t feel locked into the traditional rectangular half wall. Some creative variations include:
- Curved or angled half walls for visual interest
- Waterfall edge countertops that extend down the living room side
- Built-in bookshelves on the living room face
- Step-down designs that create multiple levels
Also Read: 10 Unique Open Shelving in the Kitchen Ideas and Decor Tips
Wooden Slat Room Divider
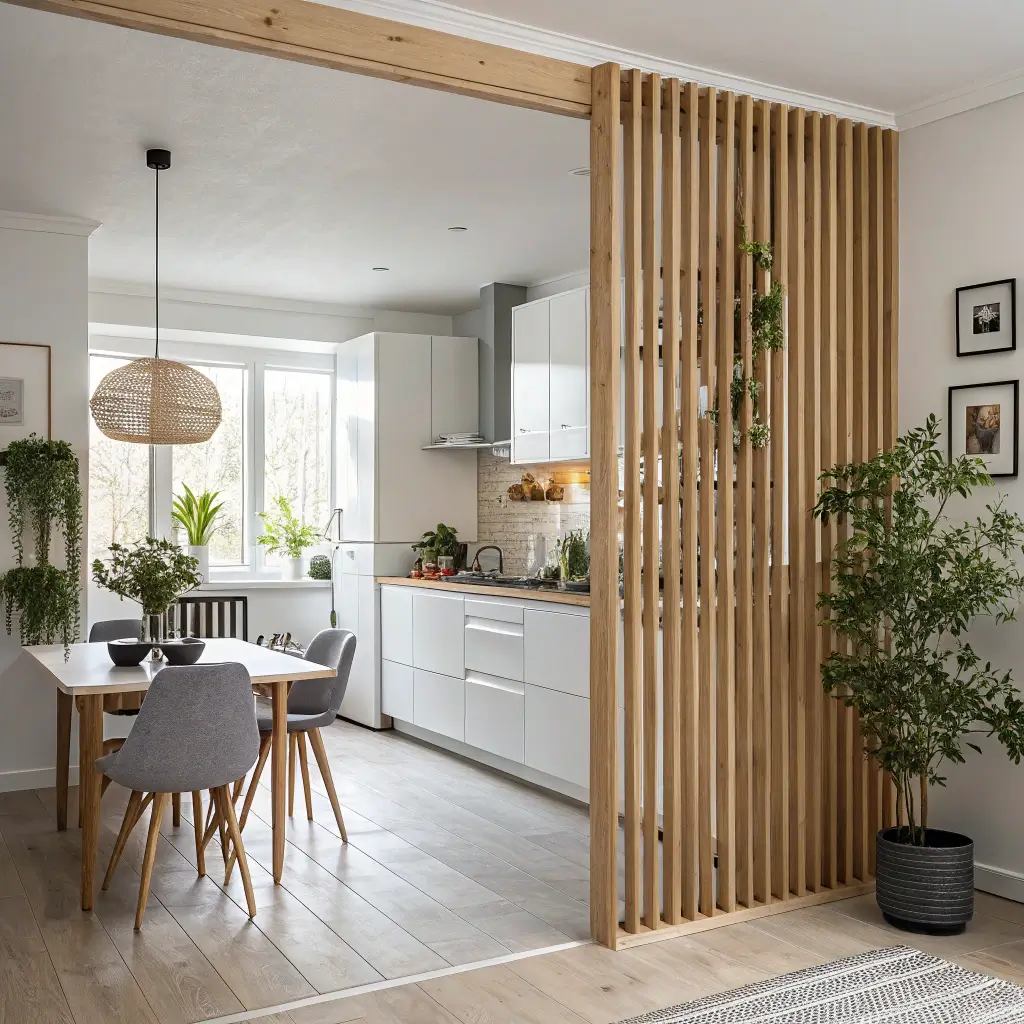
Okay, wooden slat dividers are having a major moment right now, and I’m completely here for it. These vertical or horizontal slat arrangements create rhythm and texture that flat walls simply can’t match.
The Visual Magic of Slats
What makes slat dividers so effective is the play of light and shadow. Throughout the day, sunlight creates shifting patterns across your floors and walls. It’s like having a constantly changing art installation built into your home.
The gaps between slats maintain airflow and visual connection while still providing psychological separation. Your brain reads the slats as a boundary, but it doesn’t feel closed off or claustrophobic.
DIY Slat Divider Construction
This is actually a surprisingly approachable DIY project. Here’s the basic process:
Materials:
- 1×2 or 1×3 wood strips (pine is budget-friendly, walnut or oak for luxury looks)
- Top and bottom mounting rails
- Wood stain or paint
- Mounting hardware
Steps:
- Measure your space and determine slat spacing (1.5-2 inches between slats works well)
- Cut all slats to uniform length
- Sand and finish each piece
- Install top and bottom rails
- Attach slats at consistent intervals
- Step back and admire your handiwork
Budget breakdown: Using pine boards and DIY installation, you’re looking at $150-$400 depending on the size of your partition. That’s incredibly reasonable for the visual impact you get.
Horizontal vs. Vertical Slats
Here’s a quick comparison to help you decide:
| Feature | Vertical Slats | Horizontal Slats |
|---|---|---|
| Visual Effect | Makes ceilings feel taller | Makes spaces feel wider |
| Privacy | Better sight blocking | More see-through at eye level |
| Construction | Easier to mount | Requires more structural support |
| Style Vibe | Modern/contemporary | Mid-century/coastal |
Personally, I lean toward vertical slats in most kitchen applications because they hide cooking activities better at standing height. But that’s just me 🙂
Sliding Barn Door Partition
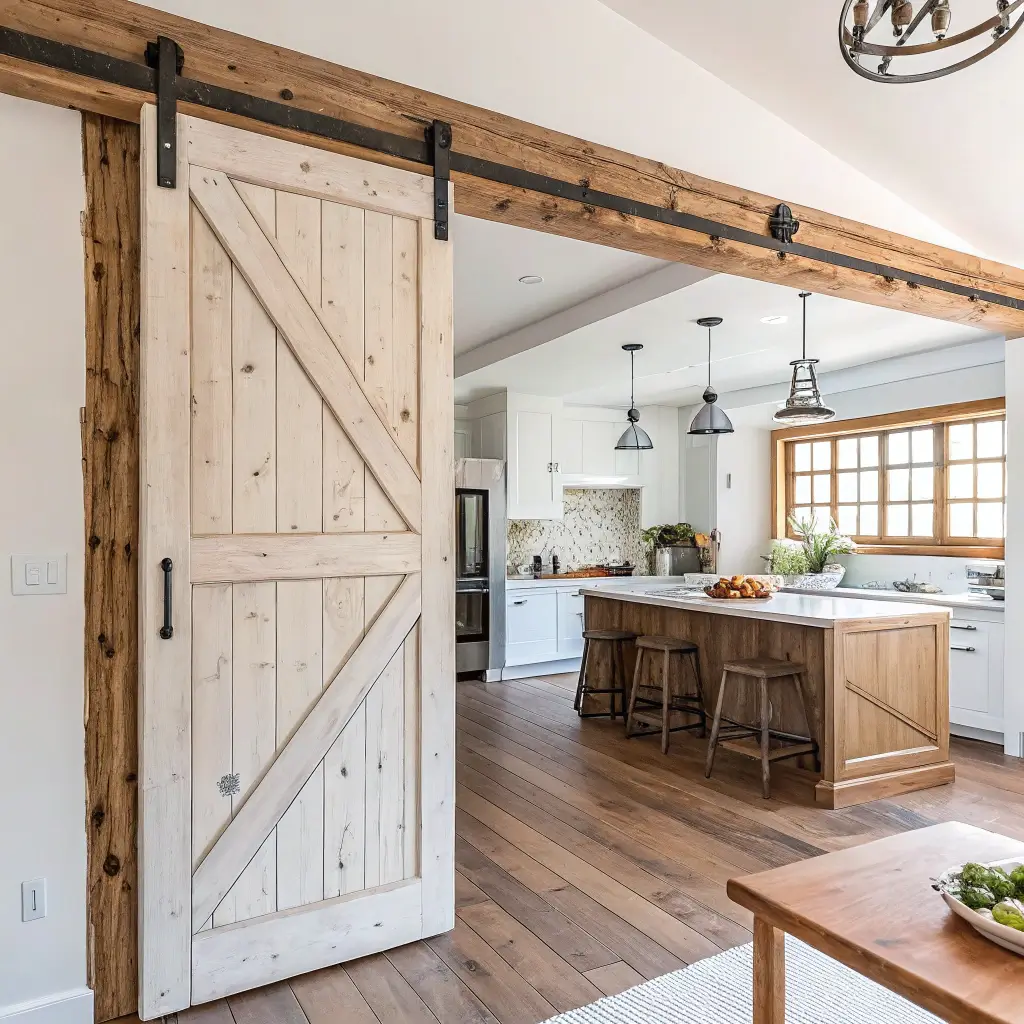
Here’s the partition that does something the others can’t—it completely closes off your kitchen when you want it to. Sliding barn doors give you the flexibility to go fully open or fully closed depending on the situation.
Why Sliding Beats Swinging
Traditional hinged doors eat up valuable floor space when opened. Barn-style sliding doors travel along the wall, requiring zero clearance space. In smaller homes or tight kitchen layouts, this difference is huge.
Plus, let’s be honest—sliding barn doors just look cooler. There’s something satisfying about that smooth glide and the statement-making hardware.
Budget Barn Door Strategies
Authentic barn doors can cost $300-$800 before hardware. Here’s how to achieve the look for less:
Budget-friendly door sources:
- Hollow-core flush doors from home improvement stores ($30-$60)
- Vintage doors from architectural salvage shops
- DIY builds using plywood and trim
- Bifold door conversions (seriously, this works great)
Hardware savings:
- Skip the designer hardware brands
- Purchase basic track systems online ($50-$100)
- Consider using plumbing pipe for an industrial look
I’ve seen people create gorgeous barn door partitions for under $200 total using hollow-core doors, simple stain, and basic hardware. The key is confidence—commit to the look and it works.
Practical Installation Tips
Critical considerations before you start:
- You need solid wall structure above the opening for track mounting
- Door width should overlap the opening by at least 2-3 inches on each side
- Consider floor guides to prevent swinging
- Don’t forget the handle—it sounds obvious, but people forget
One common mistake? Installing the track too close to the wall. Leave at least 1-inch standoff space so the door hangs properly and doesn’t scrape.
Indoor Plant Divider

Now we’re getting into my personal favorite territory. Plants as partitions? It’s literally bringing the outdoors in while solving your open kitchen problems. Double win.
Living Partitions: The Benefits
Beyond the obvious beauty factor, plant dividers offer some unique advantages:
- Natural air purification—especially valuable in kitchen spaces
- Sound absorption that reduces noise transfer
- Humidity regulation that many kitchens need
- Psychological benefits of having greenery nearby
- Ever-changing visual interest as plants grow and evolve
Plus, cooking near plants just feels different. More peaceful. More connected to something natural amidst all that stainless steel and technology.
Plant Divider Setups That Actually Work
You’ve got several approaches to choose from:
Potted Plant Arrangement:
- Large floor planters arranged in a row
- Mix tall and medium plants for visual depth
- Use matching planters for cohesion
- Budget: $100-$400 depending on plant and planter choices
Vertical Plant Wall:
- Mounted planting pockets or living wall systems
- Requires irrigation planning
- More dramatic visual impact
- Budget: $200-$800 for DIY systems
Planter Box Divider:
- Custom built planter as furniture piece
- Can include built-in trellis for climbing plants
- Doubles as additional prep surface if capped
- Budget: $150-$500 DIY
Best Plants for Kitchen Partitions
Not all plants thrive in kitchen environments. Here are your best bets:
High performers:
- Pothos—virtually indestructible, trails beautifully
- Snake plants—tolerates low light, handles humidity swings
- Fiddle leaf fig—dramatic height, loves bright indirect light
- Spider plants—air purifying champions
- Herbs—functional and fragrant (rosemary, mint, basil)
Avoid these:
- Delicate ferns (too sensitive to temperature changes)
- Succulents (kitchen humidity is usually too high)
- Anything that drops leaves constantly (cleanup nightmare)
Also Read: 12 Perfect Open Floor Plan Living Room and Kitchen Ideas for Homes
Open Cabinet Display Partition
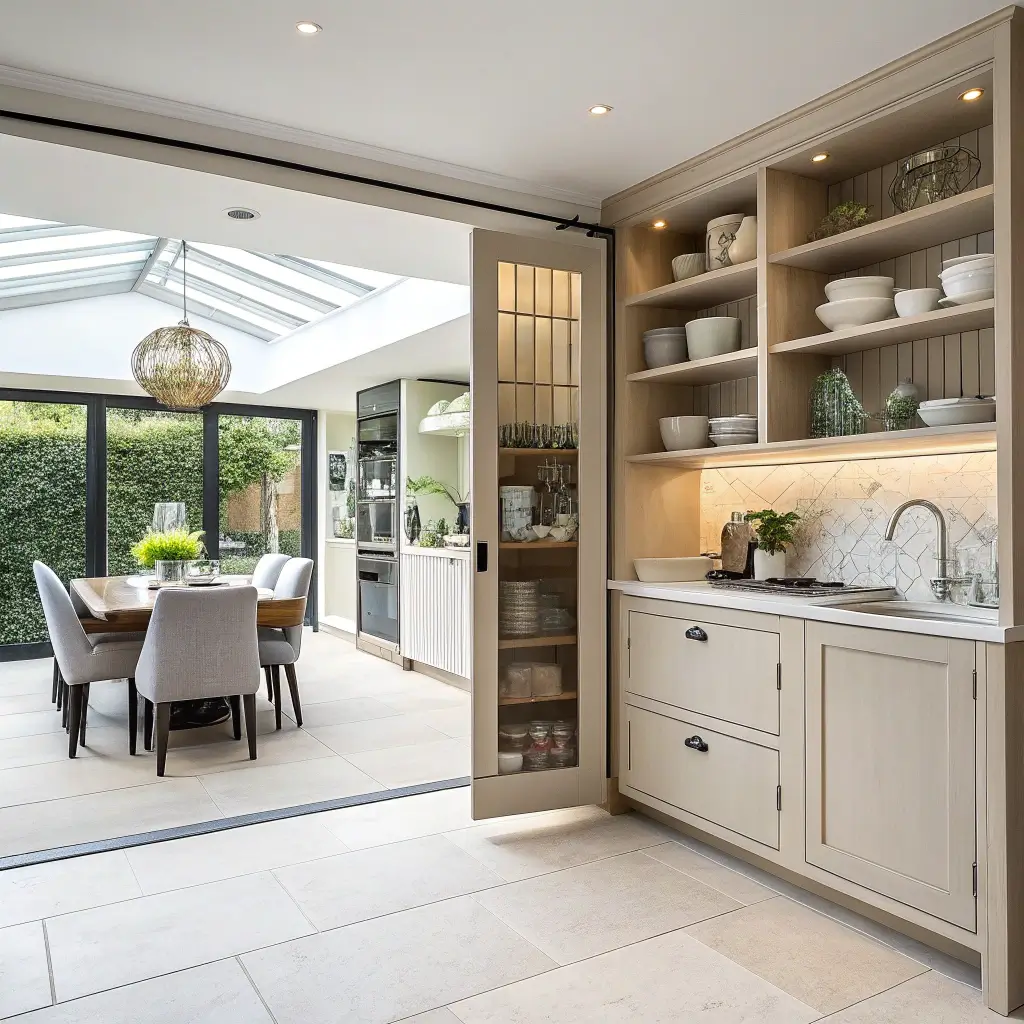
Why choose between storage and separation when you can have both? Open cabinet display partitions work overtime, serving as functional storage while creating visual boundaries.
The Design Logic
Open-back cabinets or shelving units positioned between kitchen and living areas create dual-facing storage. You access cooking items from the kitchen side while the living room side displays decorative pieces.
The key is choosing or building units that look intentional from both directions. Cheap, back-panel shelving won’t cut it here—you need something that presents well on all sides.
Finding or Building the Right Unit
Store-bought options:
- IKEA’s Kallax and Billy systems can work as bases
- Room divider shelving units from furniture stores
- Vintage credenzas or hutches without backing
- Commercial restaurant shelving (surprisingly stylish)
Custom building advantages:
- Exact sizing for your space
- Matching wood tones with existing cabinetry
- Integrated features like wine storage or lighting
- Higher quality construction
For custom builds, consider hiring a local woodworker. I got quotes ranging from $600-$1,200 for a 5-foot custom open cabinet partition—pricier than other options, but the craftsmanship shows.
Organizing for Both Sides
Think strategically about what faces which direction:
Kitchen-facing shelves:
- Frequently used dishes and glassware
- Cookbooks you actually reference
- Food storage containers with attractive contents
- Small appliances you use daily
Living room-facing shelves:
- Decorative objects and artwork
- Books and photo frames
- Display dishes or collections
- Plants and candles
Both sides (center shelves):
- Wine bottles (look great from any angle)
- Matching storage baskets
- Sculptural objects
Decorative Screen Panels

Decorative screens might be the most underrated partition option out there. They’re portable, affordable, and infinitely customizable—perfect if you’re renting or commitment-phobic about permanent solutions.
The Flexibility Factor
Unlike fixed partitions, decorative screens can:
- Move wherever you need them
- Fold flat for storage when not needed
- Change completely with your evolving style
- Come with you when you move
This flexibility makes screens ideal for renters or anyone who likes changing things up regularly. Bored with your current look? Swap the screen for a completely different vibe.
Screen Styles That Work
The decorative screen market is massive. Here are styles that particularly suit kitchen partition purposes:
Laser-cut metal screens:
- Intricate patterns create beautiful shadow play
- More durable than wood in kitchen environments
- Price range: $150-$600
Woven room dividers:
- Rattan, seagrass, or bamboo options
- Natural texture adds warmth
- Price range: $100-$400
Shoji-style screens:
- Japanese-inspired paper or fabric panels
- Diffuse light beautifully
- Price range: $75-$350
Reclaimed material screens:
- Vintage shutters, old doors, window frames
- Unique character impossible to replicate
- Price range: Free to $300 (depending on sourcing)
DIY Screen Projects
Making your own decorative screen is genuinely achievable:
Simple hinge-panel screen:
- Get 3-4 solid wood panels or hollow-core doors
- Apply decorative treatment (paint, wallpaper, fabric)
- Connect panels with piano hinges
- Add feet or casters for stability
Macramé divider screen:
- Build or buy a simple frame
- Learn basic macramé knots (YouTube is your friend)
- Create your pattern with cotton rope
- Hang or mount the completed piece
I made a basic three-panel screen using clearance shutters and spray paint for about $60 total. It’s not fancy, but it does the job beautifully.
Hanging Curtain Partition
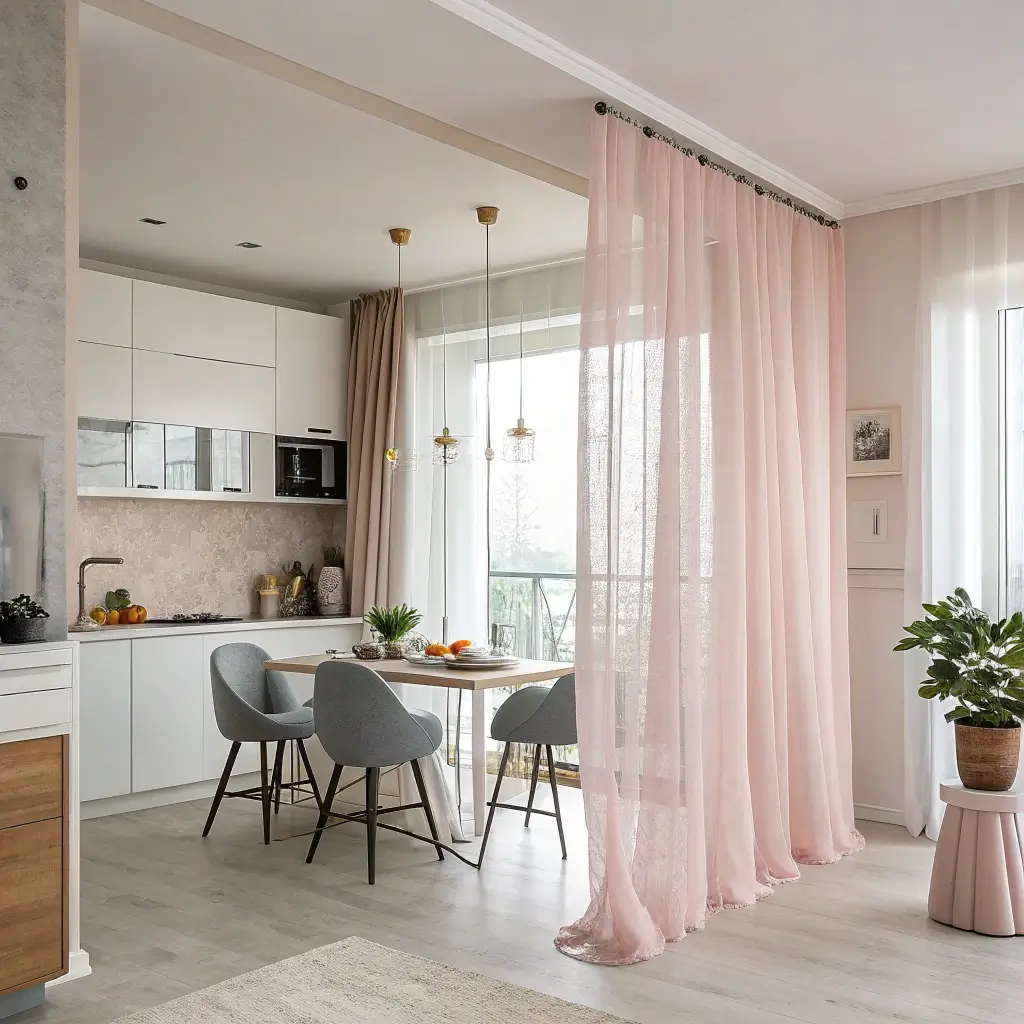
Sometimes the simplest solutions work best. Hanging curtains between kitchen and living areas might seem basic, but done thoughtfully, this approach delivers serious style and function.
Why Curtains Shouldn’t Be Dismissed
I’ll admit—I initially dismissed curtain partitions as “lazy” solutions. Then I installed one and completely changed my mind. Here’s what curtains offer:
- Immediate installation—seriously, under an hour
- Easy washing when they absorb cooking odors
- Total flexibility in opening, closing, or positioning
- Sound dampening that reduces noise transfer
- Unlimited aesthetic options with fabric choices
The ability to wash curtains periodically makes them especially practical for kitchen use. Other partitions collect grease and dust that’s difficult to clean—curtains just go in the washing machine.
Hardware and Hanging Methods
You’ve got several approaches depending on your ceiling type and aesthetic goals:
Ceiling-mounted track:
- Professional look, smooth operation
- Works with any fabric weight
- Best for permanent installations
- Cost: $50-$200 for track systems
Tension rod installations:
- No drilling required
- Limited to narrower openings
- Great for renters
- Cost: $20-$60
Industrial pipe mounting:
- Creates statement-making hardware
- Handles heavy fabrics easily
- DIY-friendly installation
- Cost: $40-$100 in materials
Rope or cable systems:
- Minimalist appearance
- Works well with lightweight fabrics
- Modern aesthetic
- Cost: $30-$80
Fabric Selection Matters
Your fabric choice dramatically affects both appearance and function:
Best kitchen-adjacent fabrics:
- Linen—breathable, washable, naturally anti-bacterial
- Cotton canvas—durable, easy care, affordable
- Polyester blends—resist moisture and staining
- Hemp or bamboo textiles—sustainable, naturally odor-resistant
Avoid these:
- Silk or delicate fabrics (staining risk too high)
- Heavy velvet (traps odors, difficult cleaning)
- Sheer fabrics (don’t provide meaningful separation)
For the best results, choose medium-weight, machine-washable fabric in colors that hide minor staining. White looks gorgeous but shows every splatter—trust me on this one.
Also Read: 10 Cozy Open Concept Kitchen Dining Living Room Ideas & Layouts
Brick or Stone Low Wall
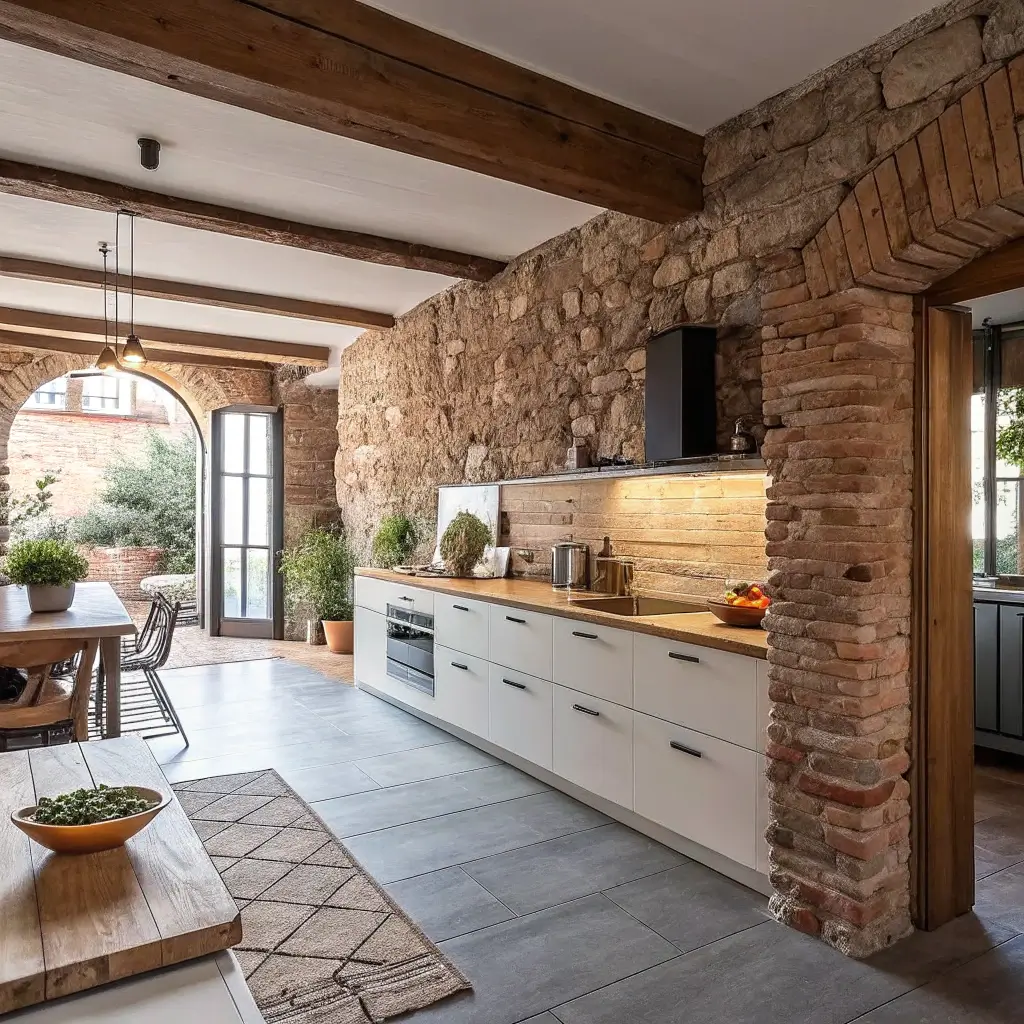
We’re ending with what might be the most dramatic option on this list. A brick or stone low wall makes a serious architectural statement while providing robust separation between spaces.
The Permanence Factor
Unlike other partitions, brick or stone walls are essentially permanent additions. They require more commitment, more budget, and often more expertise to install. But the result? Pure character that cheaper solutions can’t replicate.
Real masonry adds:
- Authentic texture and weight that elevates entire rooms
- Heat retention useful near cooking areas
- Fire resistance (always nice near stoves)
- Timeless appeal that outlasts trends
Budget-Friendly Masonry Approaches
True brick or stone installation gets expensive—we’re talking $2,000-$8,000 for professional work. But several alternatives achieve similar looks:
Brick veneer panels:
- Thin real brick attached to panels
- Much lighter than full brick
- DIY-friendly installation
- Cost: $300-$800 for typical partition size
Faux stone panels:
- Lightweight polyurethane or composite materials
- Surprisingly realistic appearance
- No structural requirements
- Cost: $200-$600
Reclaimed brick salvage:
- Source from demolition sites or salvage yards
- Install yourself on simple block wall base
- Authentic character, lower cost
- Cost: $500-$1,500 (mostly labor savings)
Painted cinder block:
- Install basic cinder blocks
- Apply limewash or thick paint treatment
- Creates similar visual weight
- Cost: $200-$500
Construction Considerations
Even partial masonry walls carry weight. Here’s what you need to know:
- Check your floor structure—can it handle the additional load?
- Consider plumbing and electrical—will your wall block anything important?
- Plan for mess—masonry work creates significant dust and debris
- Factor in drying time—mortar needs proper curing
- Think about future changes—removing masonry is no joke
I’d honestly recommend consulting a contractor even for DIY projects. Fifteen minutes of professional advice could save thousands in mistakes.
Bringing It All Together
So there you have it—ten practical ways to partition your open kitchen without sacrificing the openness you originally wanted. From budget-friendly curtains to statement-making masonry, there’s genuinely an option for every style, skill level, and budget.
Here’s what I want you to remember:
The best partition solves your specific problems. If cooking odors are your main concern, prioritize options that actually block airflow (glass, sliding doors, curtains). If visual mess bothers you most, half walls and open cabinets hide chaos while maintaining connection.
You don’t have to spend a fortune. I’ve personally implemented solutions from nearly every category on this list, and my most successful partitions weren’t my most expensive ones. The floating shelf divider I built for under $200 gets more compliments than anything else in my kitchen.
Temporary solutions are valid. Not ready to commit? Decorative screens and curtains let you experiment without permanent changes. You can always upgrade later when you know exactly what works for your lifestyle.
Mix and match freely. Who says you can only choose one approach? Plants plus a half wall? Glass panels with integrated shelving? Combine ideas to create something perfectly suited to your space.
Start small if you need to. Even a simple curtain partition or row of plants can transform how your open kitchen functions. Once you see the improvement, you’ll probably find yourself dreaming up more ambitious projects.
And honestly? That’s half the fun. These spaces we call home deserve our attention and creativity. A little partition problem is really just an opportunity to make something beautiful.
Now stop reading and start planning—your perfect open kitchen partition is waiting to be built.