Wall Decor Living Room Ideas: 15 Eye-Catching Ideas for Every Style
Blank walls staring back at you? Yeah, I’ve been there. That awkward moment when guests come over and you catch them glancing at your bare walls, probably wondering if you just moved in yesterday.
Well, grab a coffee and let’s chat about some wall decor living room ideas that’ll make your space actually feel like home.
I spent three months with completely empty walls after moving into my current place. Not by choice – I just couldn’t figure out what to do with them.
After tons of Pinterest scrolling and some questionable DIY attempts (we’ll get to those), I finally cracked the code. These 15 ideas aren’t just theories; they’re battle-tested solutions that actually work.
Gallery Wall with Mixed Frames
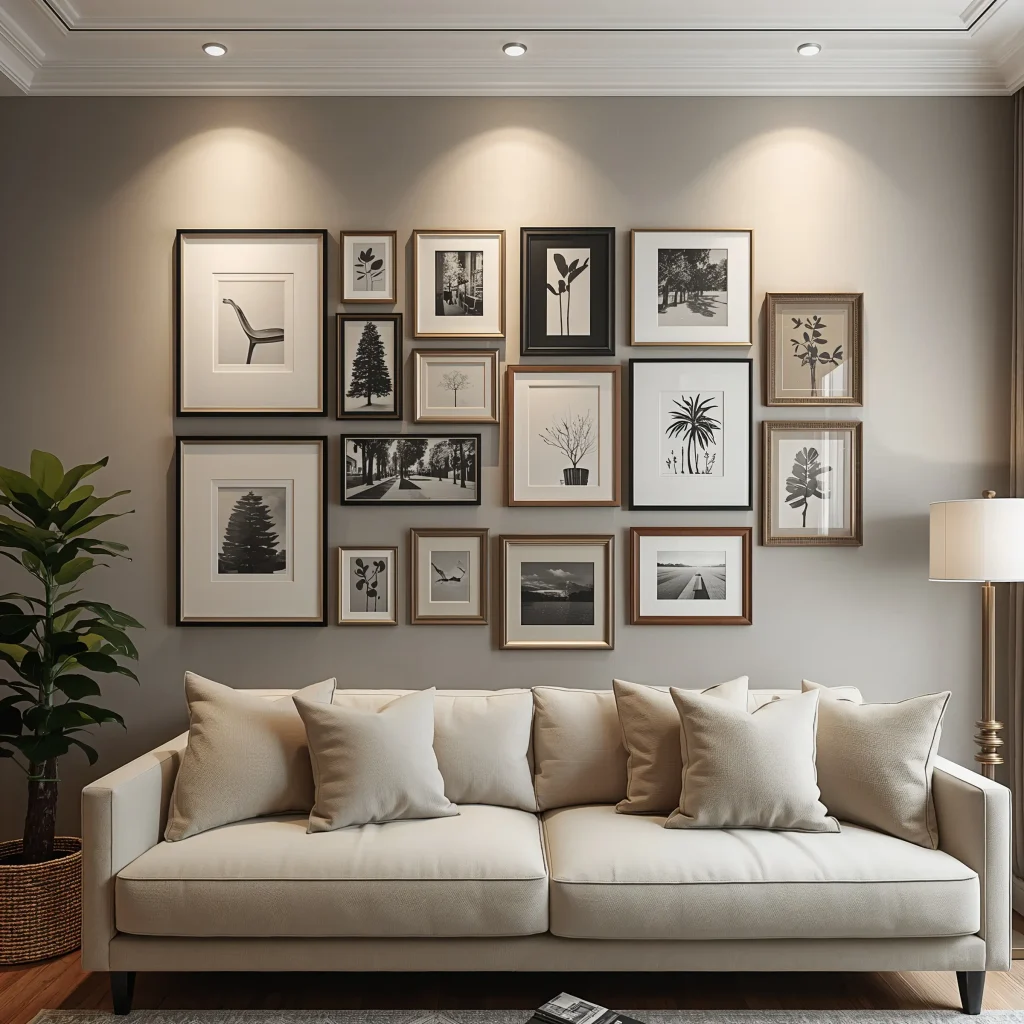
Let’s kick things off with the classic gallery wall – except we’re throwing the rulebook out the window. Who says all your frames need to match? That’s boring, and frankly, it screams “I bought this set at Target.”
Mix black frames with gold ones. Toss in some natural wood. Add a circular mirror while you’re at it. The beauty of a mixed-frame gallery wall lies in its controlled chaos. I started mine with just three frames and kept adding pieces over months. Now it tells the story of my travels, family moments, and that random watercolor I painted during lockdown.
Making It Work Without Going Crazy
Here’s what nobody tells you about gallery walls: planning saves sanity. Cut paper templates of your frames and tape them to the wall first. Move them around until you love the arrangement. Trust me, this beats hammering seventeen holes only to realize everything’s crooked.
Keep these spacing rules in mind:
- 2-3 inches between smaller frames
- 4-5 inches between larger pieces
- Eye level should hit the center of your arrangement (roughly 57-60 inches from the floor)
The secret sauce? Start with your largest piece slightly off-center, then build around it. This creates visual interest without looking like you tried too hard.
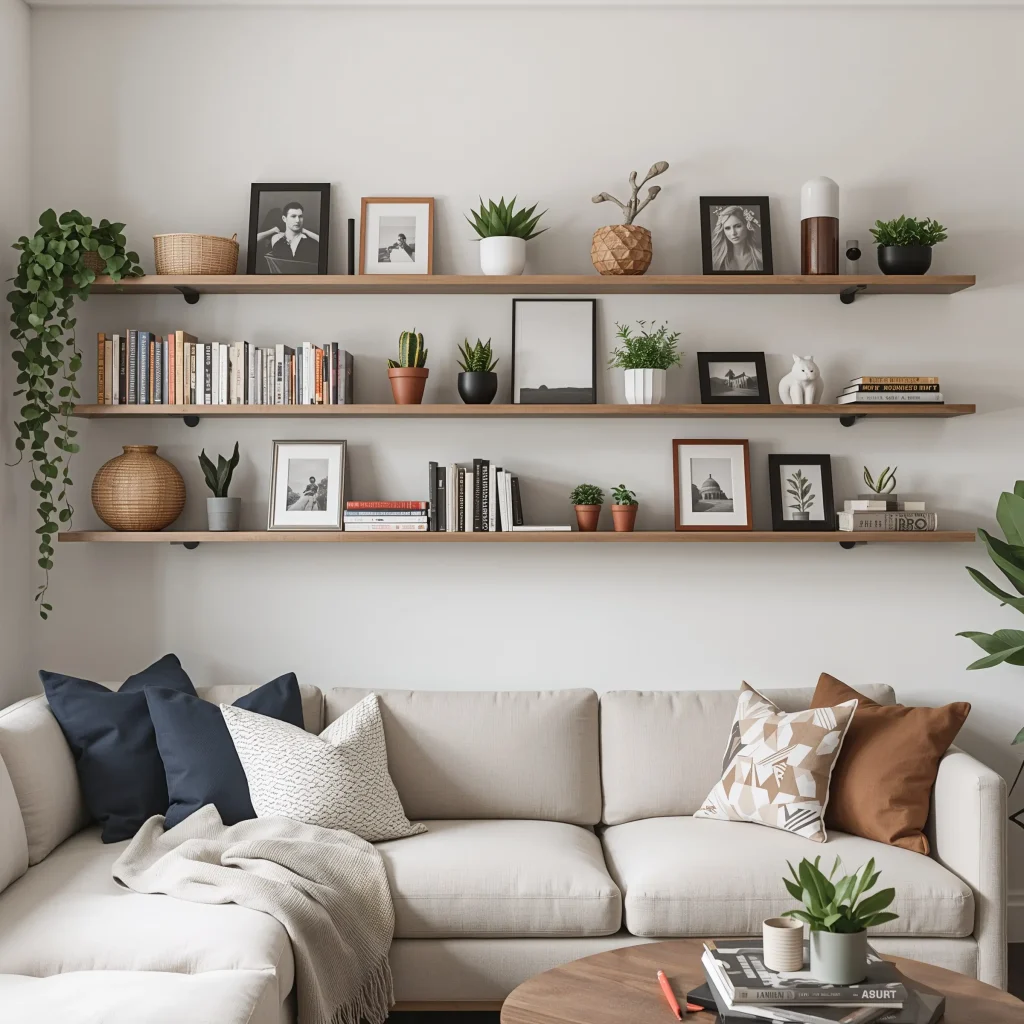
Floating Shelves with Decorative Accents

Floating shelves changed my living room game completely. They’re like functional art – you get storage AND style points. But here’s where most people mess up: they treat floating shelves like a dumping ground for random stuff.
I learned this lesson the hard way. My first attempt looked like a garage sale exploded on my wall. Now? Each shelf has a purpose and personality. The top shelf holds my small plant collection (yes, they’re still alive, thanks for asking). The middle showcases a few favorite books standing next to a vintage camera. The bottom features a rotating display of seasonal decor.
The Rule of Odds
Want your shelves to look professionally styled? Group items in odd numbers. Three candles. Five books. One statement piece. Our brains find odd numbers more visually appealing – don’t ask me why, but it works every single time.
Mix heights and textures too. Pair that tall vase with a short succulent and a medium-height picture frame. Add different materials: wood, metal, glass, ceramic. This creates depth that makes people want to look closer.
Large Statement Canvas Art
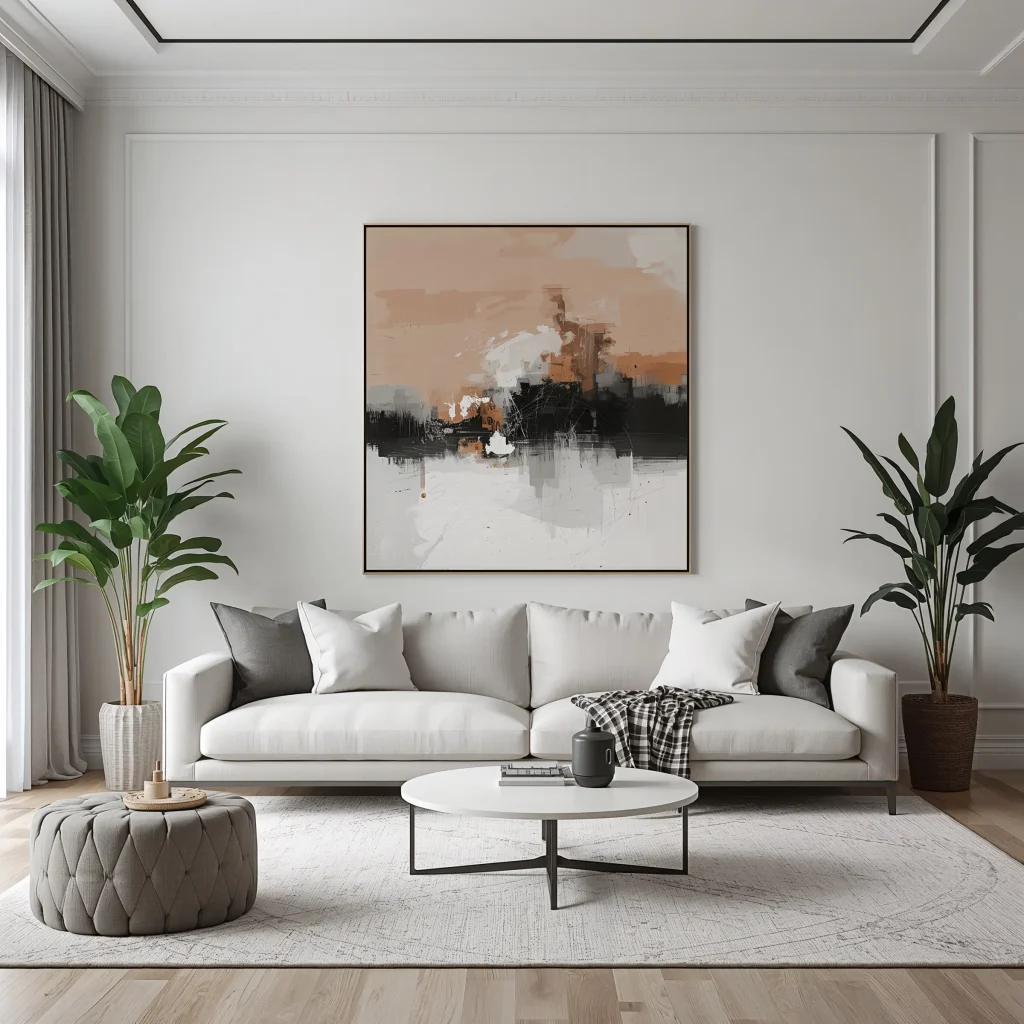
Sometimes you need to go big or go home. A massive canvas can anchor your entire living room and become an instant conversation starter. I’m talking about the kind of piece that makes guests stop mid-sentence and say, “Whoa, where’d you get that?”
My 60×40 inch abstract piece cost less than multiple smaller artworks would have. Plus, it fills that huge wall space above my couch without requiring me to arrange fifteen different items. One and done – perfect for the decisively indecisive among us.
Sizing It Right
Here’s my formula for statement art sizing:
- Above a sofa: Go for 2/3 the width of your couch
- Empty wall: Aim for artwork that takes up 60-75% of the wall space
- Above a console: Keep it narrower than the furniture below
And please, hang it at the right height. The center should sit at eye level when you’re standing. Above furniture? Leave 6-8 inches of breathing room.
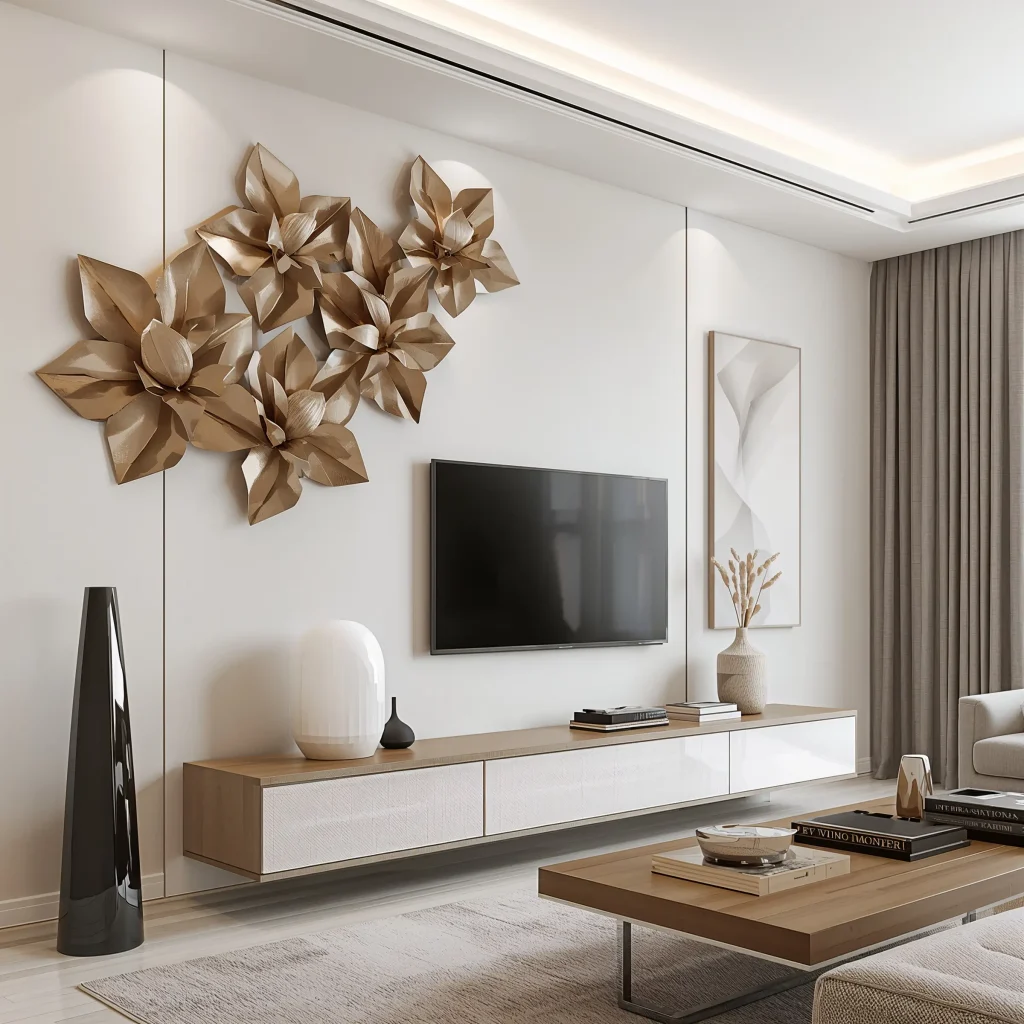
Also Read:15 Beautiful TV Wall Decor Ideas for a Modern Chic Look
DIY Macrame Wall Hanging
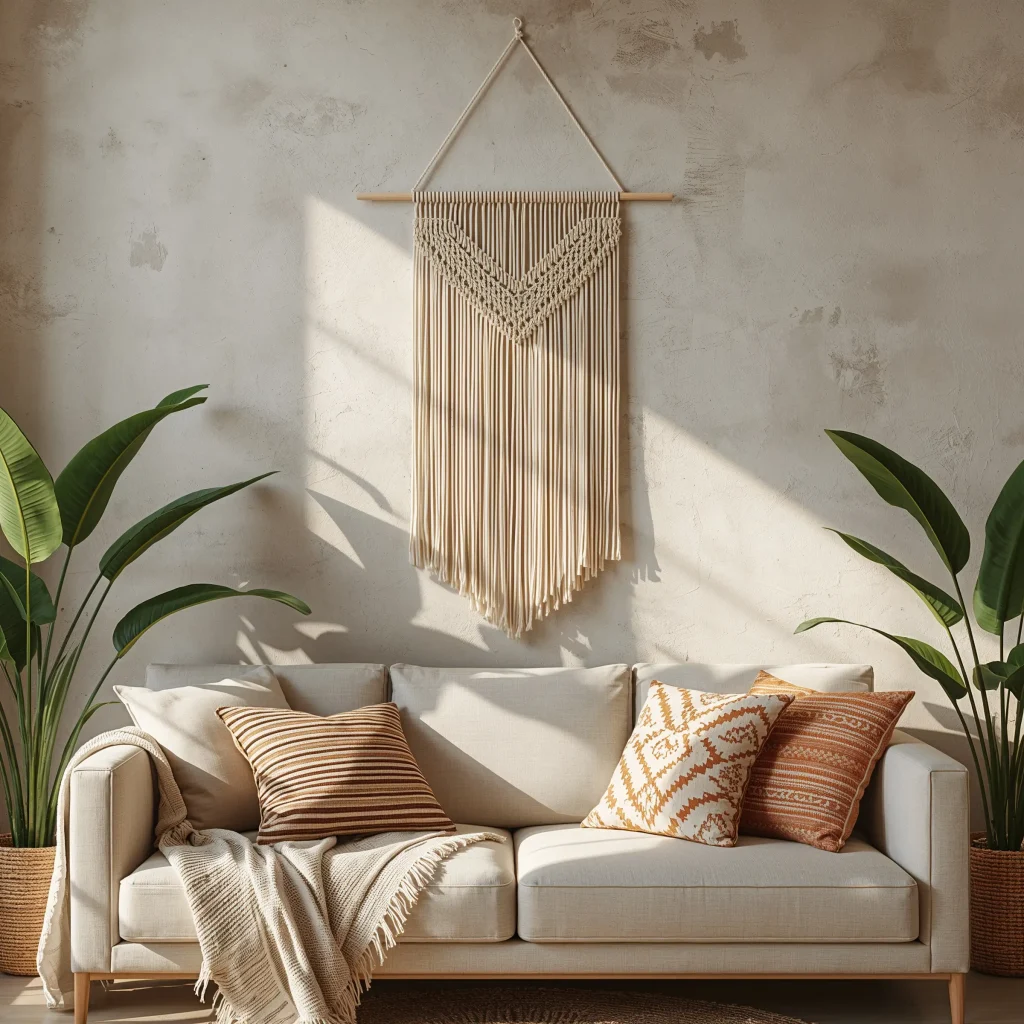
Okay, confession time: I thought macrame was just for beach houses and yoga studios. Wrong. Modern macrame brings incredible texture to any living room, and making your own isn’t as hard as YouTube makes it look.
My first attempt? Let’s just say it looked more like a fishing net that lost a fight with a cat. But attempt number two actually turned out pretty decent. The key is starting simple – basic knots, neutral rope, manageable size.
Getting Started Without Losing Your Mind
You need three things:
- Cotton cord (5mm works great for beginners)
- A dowel or branch for hanging
- Patience (and maybe wine)
Start with a simple pattern using just square knots and gathering knots. Once you nail those, you can get fancy with diagonal patterns and fringe. The best part? If you mess up, you just untie and start over. No permanent damage, unlike that time I tried to install a TV mount… :/
Vertical Plant Wall
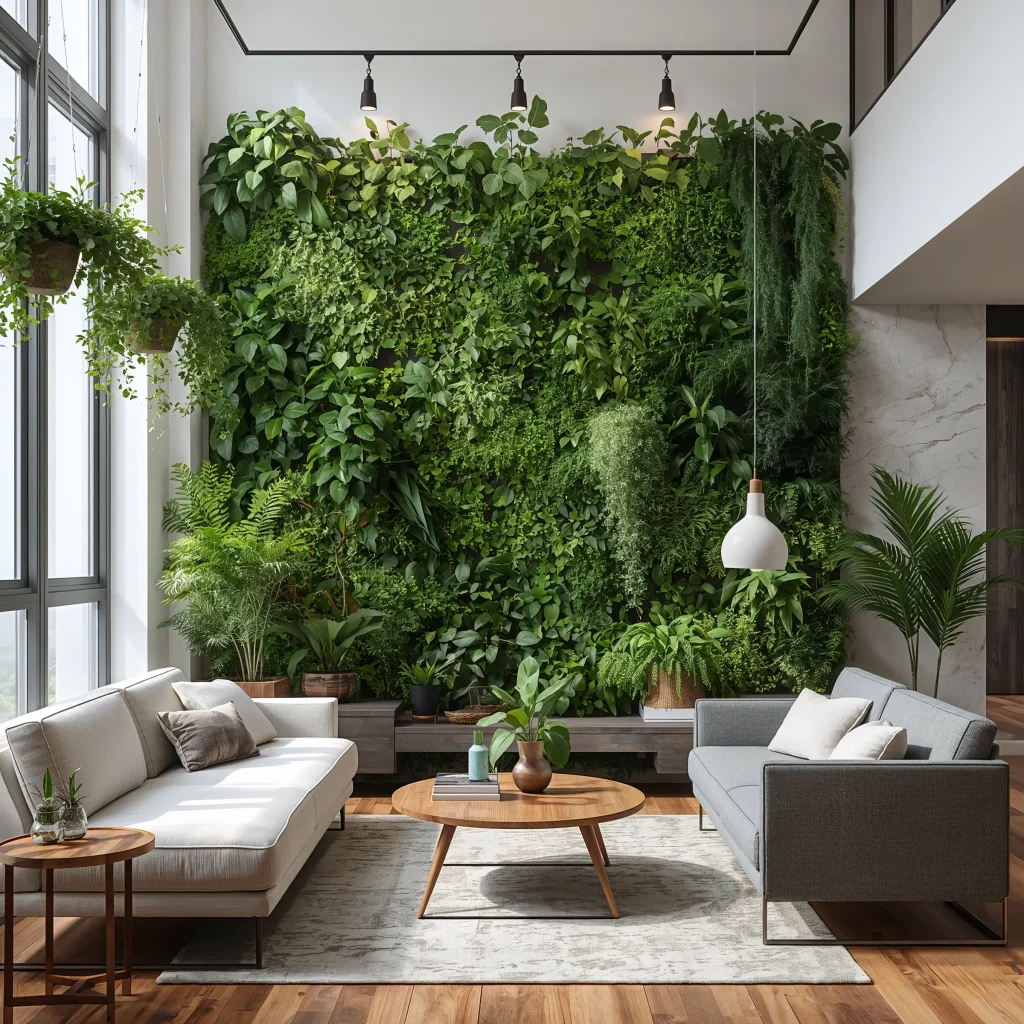
Plants make everything better – that’s just science. But a vertical plant wall takes things to another level. We’re talking living art that actually improves your air quality while looking Instagram-worthy.
I started with a simple grid system and six plants. Now I’ve got twelve plants creating this lush green focal point that everyone comments on. The trick is choosing the right plants for your light situation. Don’t be that person who kills succulents because they stuck them in a dark corner.
Plant Selection for Success
For bright, indirect light:
- Pothos (practically indestructible)
- Spider plants (they’ll forgive your neglect)
- Philodendrons (gorgeous and low-maintenance)
For lower light situations:
- Snake plants (they thrive on neglect)
- ZZ plants (water once a month, seriously)
- Peace lilies (they’ll tell you when they’re thirsty)
Pro tip: Mix trailing plants with upright ones for visual variety. And FYI, those self-watering planters are worth every penny if you’re forgetful like me.
Minimalist Geometric Wall Panels
Want something modern without the commitment of paint? Geometric wall panels deliver clean lines and contemporary vibes without touching a brush. I’m obsessed with how they add dimension to flat walls.
You can buy pre-made panels or DIY them with wood strips and patience. I went the DIY route (shocker, right?) and created a hexagon pattern using balsa wood and wood stain. Total cost: under $50. Impact: priceless.
Creating Your Own Pattern
Start with graph paper and sketch your design. Keep it simple at first – triangles, hexagons, or simple rectangles work great. Cut your wood strips with a miter saw (or sweet-talk someone at Home Depot to do it for you).
The assembly requires:
- Wood glue for joining pieces
- Double-sided mounting tape for the wall
- A level (crooked geometric patterns are not a vibe)
Paint them, stain them, or leave them natural. The shadows they cast throughout the day add an extra design element you didn’t even plan for.
Vintage Mirror Collection
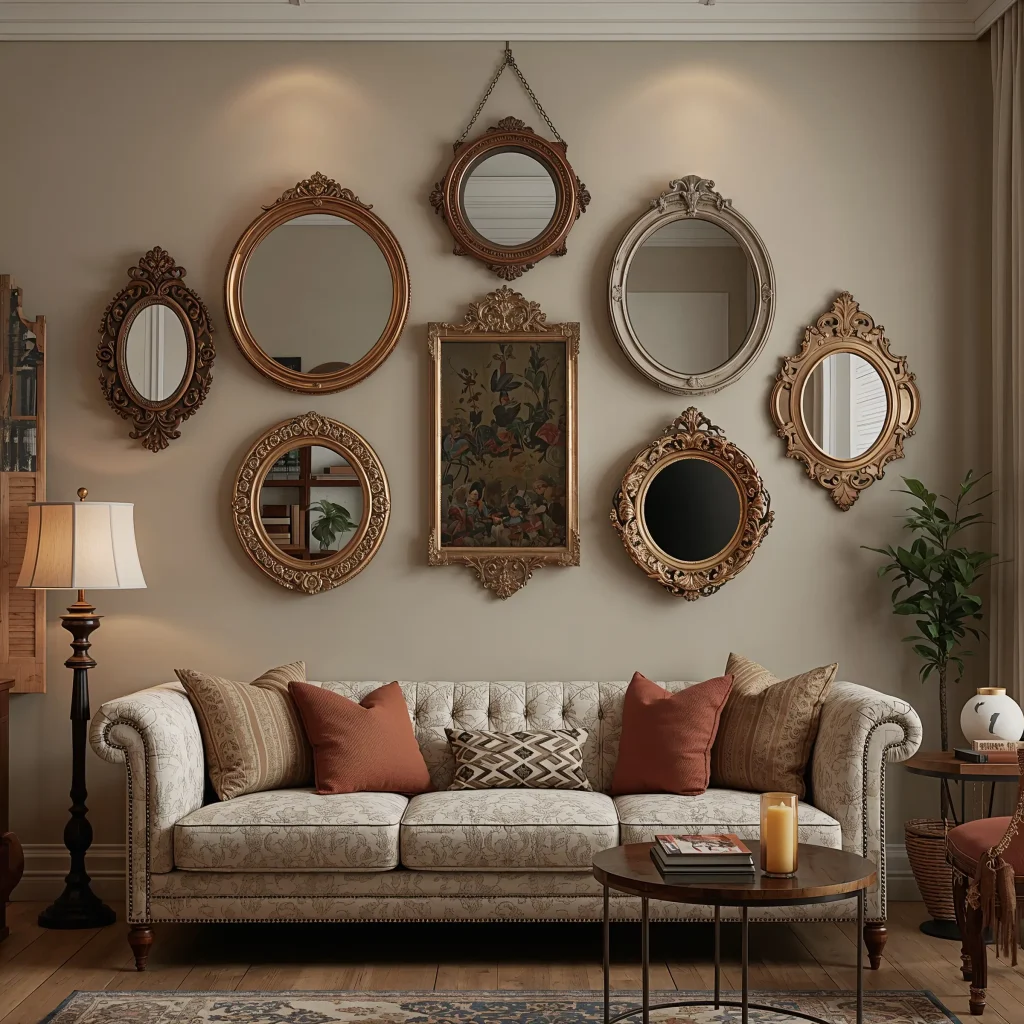
Mirrors aren’t just for checking if you have spinach in your teeth. A curated collection of vintage mirrors creates depth, reflects light, and makes your space feel twice as big.
I hunt for mirrors at estate sales and thrift stores. Each one has character – tarnished silver frames, ornate gold details, simple wood borders. Together, they create this eclectic gallery that feels collected over time (because it was).
Arrangement Tips That Actually Work
Group mirrors like you would artwork:
- Vary the sizes dramatically
- Mix shapes (round with rectangular, oval with square)
- Keep frames within the same color family for cohesion
Hang them opposite windows to maximize natural light. Or place them behind lamps to amplify ambient lighting. Just avoid hanging them where they’ll reflect your TV – learned that one the hard way during movie night.
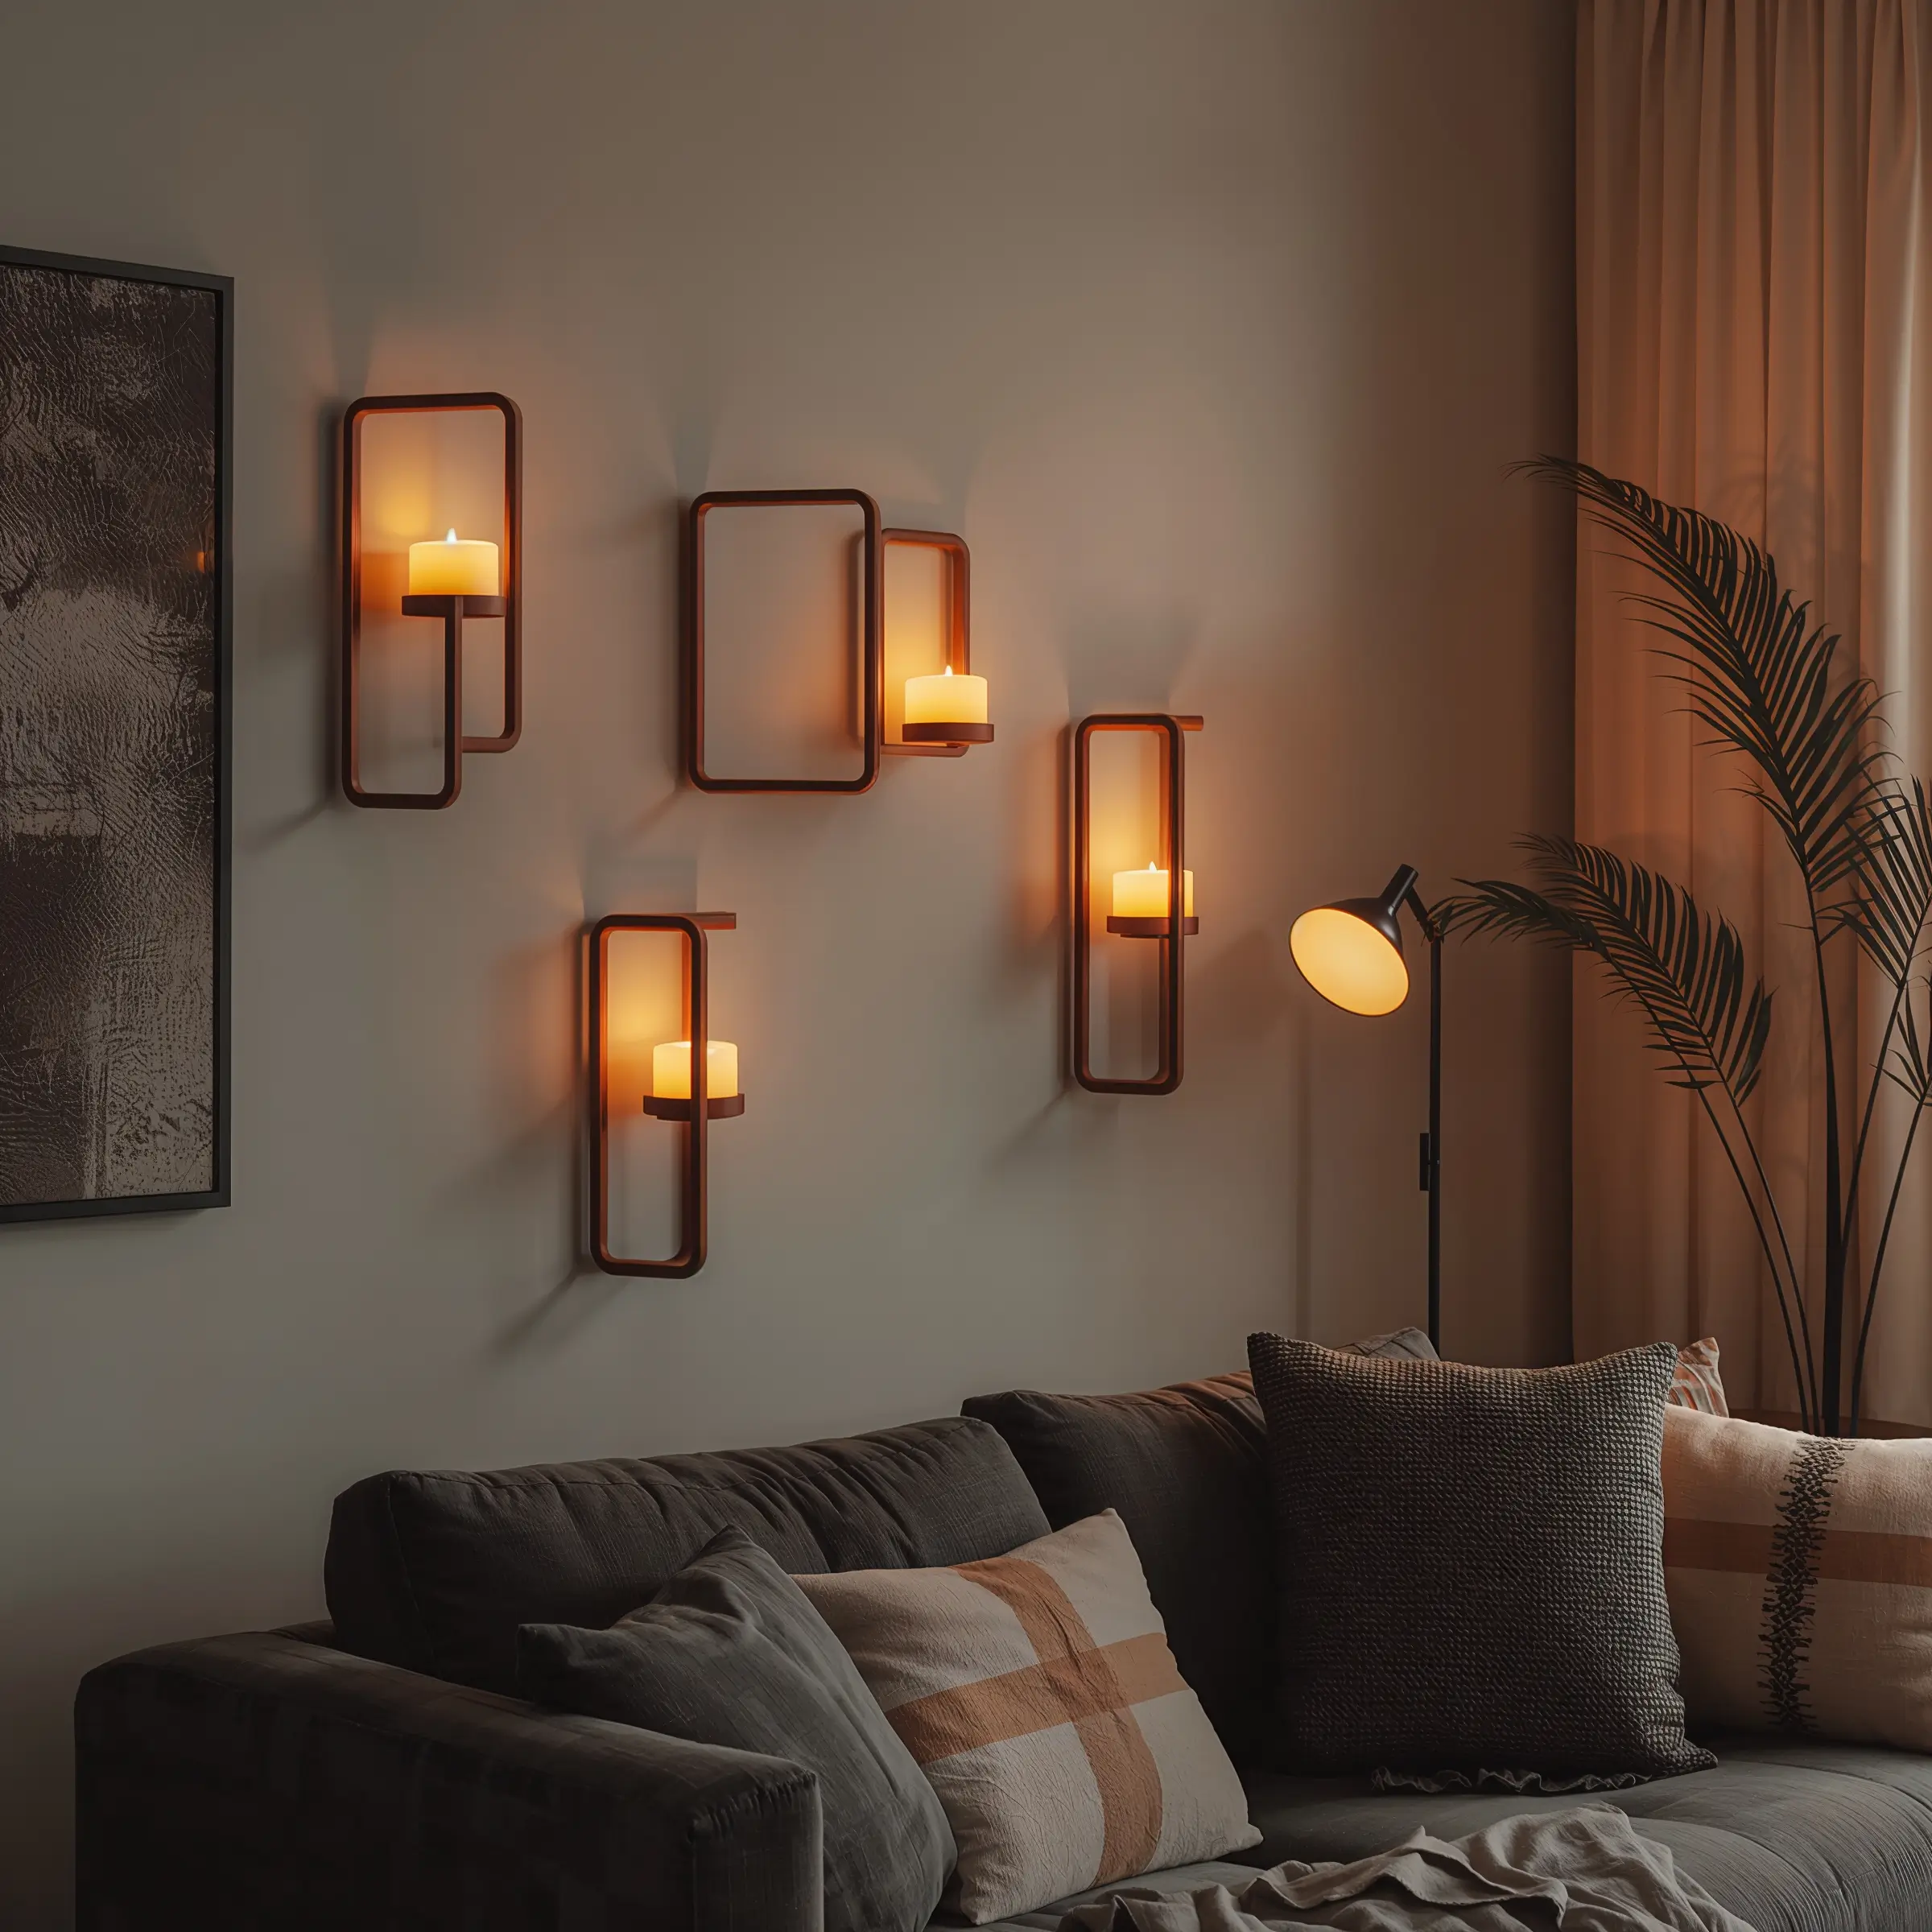
Wall-mounted Candle Holders

Candles on tables are so predictable. Wall-mounted candle holders bring warmth up to eye level where it actually makes an impact. Plus, they free up surface space for important things, like your coffee mug collection.
I installed a set of three iron sconces on either side of my TV. When lit, they create this cozy ambiance that makes Netflix nights feel special. When not lit, they’re sculptural elements that add visual interest.
Safety First (Boring but Necessary)
Real candles on walls require attention:
- Keep them away from curtains (obviously)
- Use dripless candles to protect your walls
- Consider LED candles for worry-free ambiance
Modern wall-mounted holders come in every style imaginable. Industrial pipe designs, minimalist floating shelves, ornate vintage sconces – pick what speaks to your style. Just make sure they’re level. Crooked candles look like your wall is melting.
Fabric Tapestry Display
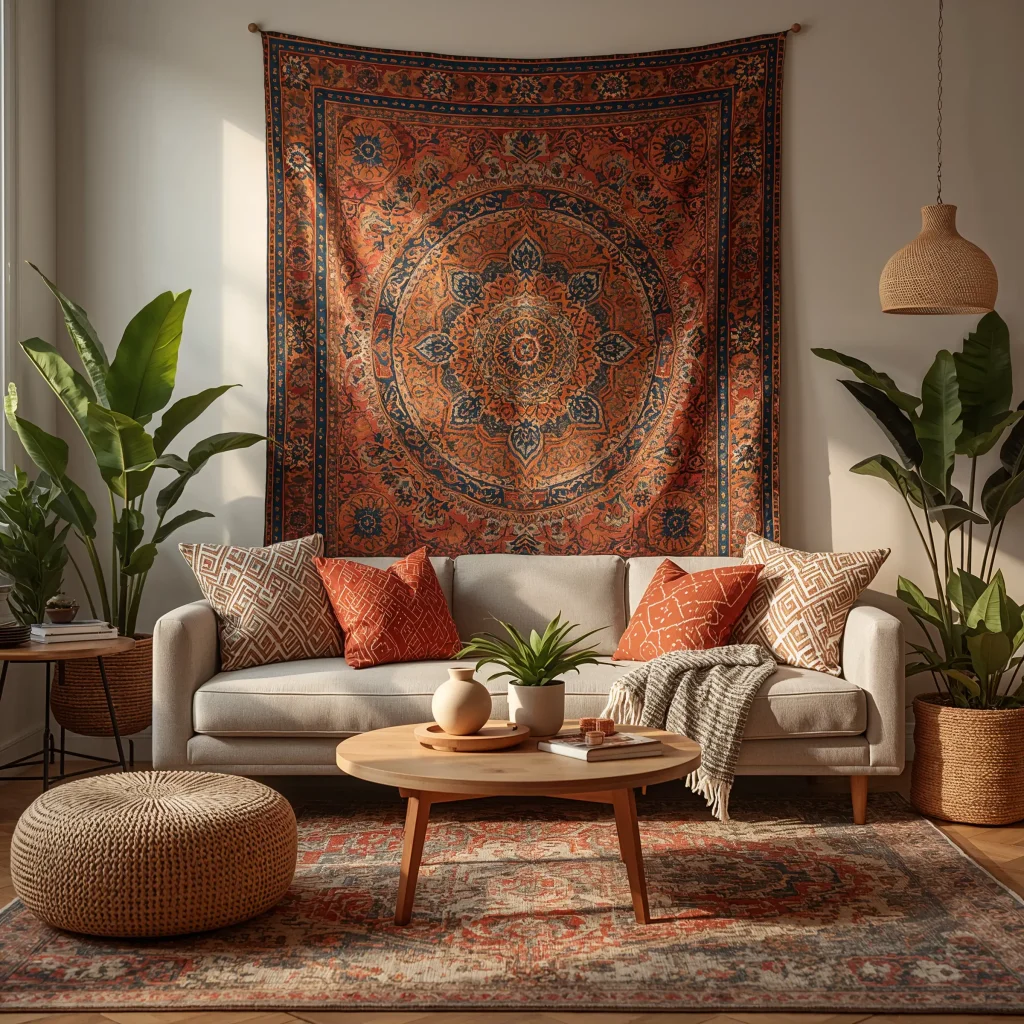
Before you roll your eyes, hear me out. Modern tapestries aren’t your college dorm room posters. We’re talking about textile art that adds softness to hard surfaces and absorbs sound (goodbye, echo-y living room).
My Turkish kilim tapestry gets more compliments than any other piece in my living room. It brings color, pattern, and texture that paint could never achieve. Plus, when I get bored, I can swap it out – try doing that with wallpaper.
Hanging Without Damage
Skip the pushpins. Here’s how to hang tapestries properly:
- Use a curtain rod for easy swapping
- Try velcro strips for lightweight pieces
- Install a dowel system for a more polished look
Choose tapestries with colors that complement your existing palette. They should enhance, not compete with, your furniture. And please, iron or steam them first. Wrinkled tapestries scream “I just unboxed this from Amazon.”
Also Read: 15 Stunning Mid Century Modern Dining Room Ideas for Inspiration
3D Wall Art Sculptures
Flat art is fine, but 3D wall sculptures bring drama that makes people stop and stare. We’re talking about pieces that cast shadows, catch light differently throughout the day, and add actual depth to your walls.
My metal sunburst sculpture looks completely different at noon versus sunset. The shadows it creates are like bonus art I didn’t pay for. That’s value, people.
Choosing the Right Scale
3D art needs breathing room:
- Large sculptures work best on empty walls
- Multiple small pieces create more impact when grouped
- Mixed media (metal with wood, ceramic with rope) adds complexity
Consider the viewing angle too. Some sculptures look amazing straight on but weird from the side. Test placement before committing to holes in your wall.
Wall-mounted Bookshelves with Decor
Books aren’t just for reading anymore (controversial, I know). Wall-mounted bookshelves let you display your literary collection alongside decorative objects, creating personalized art installations.
My floating book ledges showcase cookbook covers like artwork. Below them, traditional shelves hold novels mixed with small plants, vintage bookends, and that weird ceramic owl my mom gave me. It’s organized chaos that tells my story.
Styling Bookshelves Like a Pro
The secret to non-boring bookshelves:
- Stack some books horizontally with objects on top
- Leave breathing room – don’t cram every inch
- Color coordinate if you’re feeling extra (I sorted mine by rainbow once, no regrets)
Mix book sizes and orientations. Add non-book items every 5-7 books to break up the monotony. Small boxes, picture frames, and plants work great as bookshelf breakers.
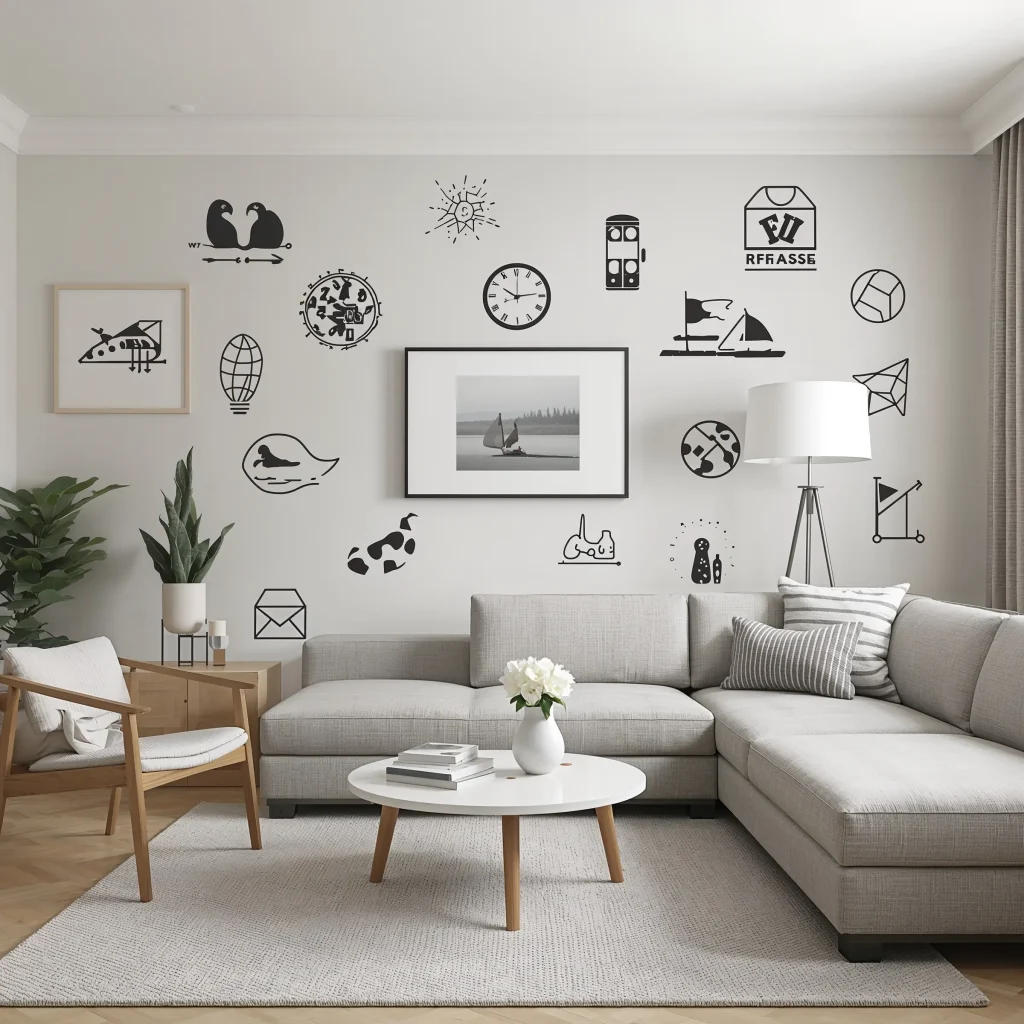
Personalized Photo Collage
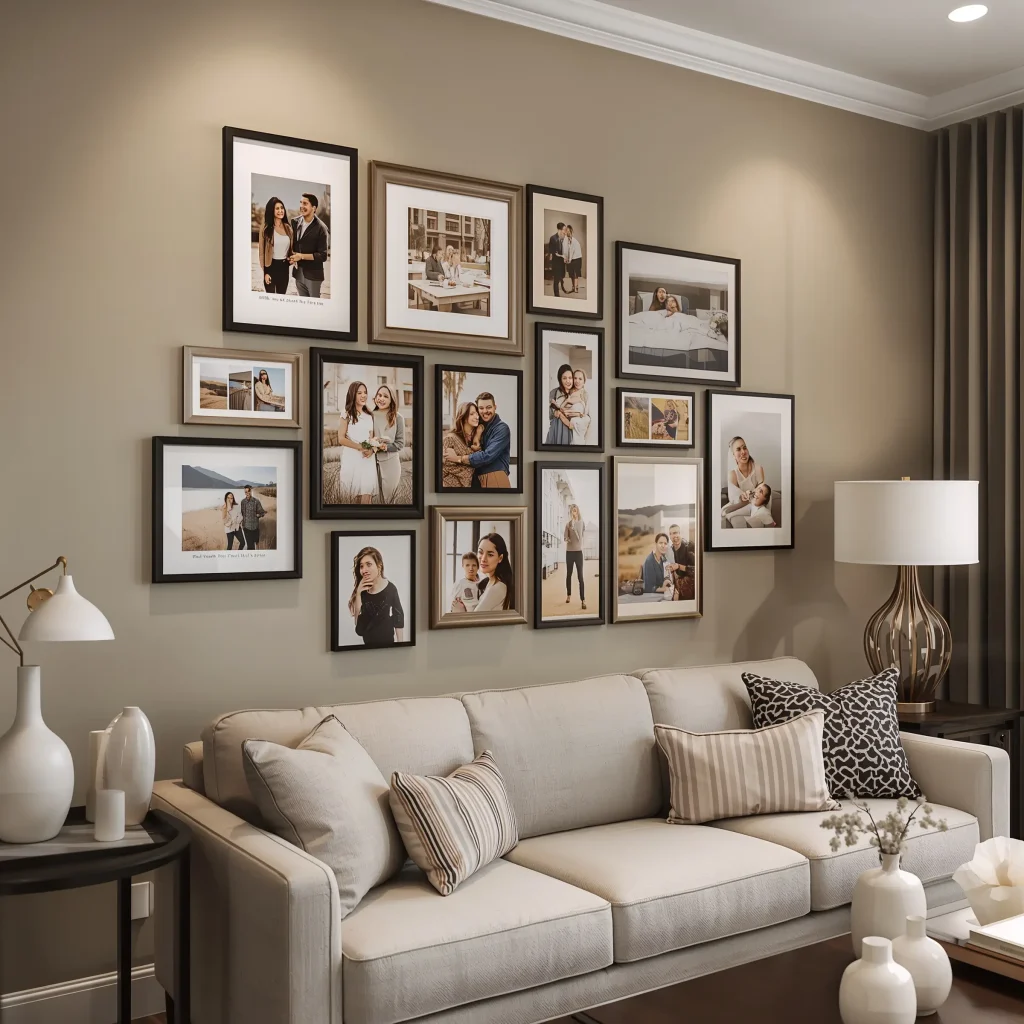
Forget those generic “Live, Laugh, Love” signs. A personalized photo collage actually means something and shows your real life, not some Pinterest fantasy.
I created mine using a mix of family photos, concert tickets, postcards, and even receipt from my favorite restaurant in Paris. Each piece triggers a memory. That’s what wall decor should do – tell your story, not someone else’s.
Making It Look Intentional
Random doesn’t mean messy:
- Stick to a color scheme (black and white, sepia, or full color)
- Use consistent spacing between elements
- Create a shape (rectangle, heart, or free-form cloud)
Print photos in various sizes. Mix 4x6s with 8x10s and everything in between. Add dimensional elements like ticket stubs under glass clips. This isn’t just decoration; it’s your personal museum.
Rustic Wooden Wall Panels
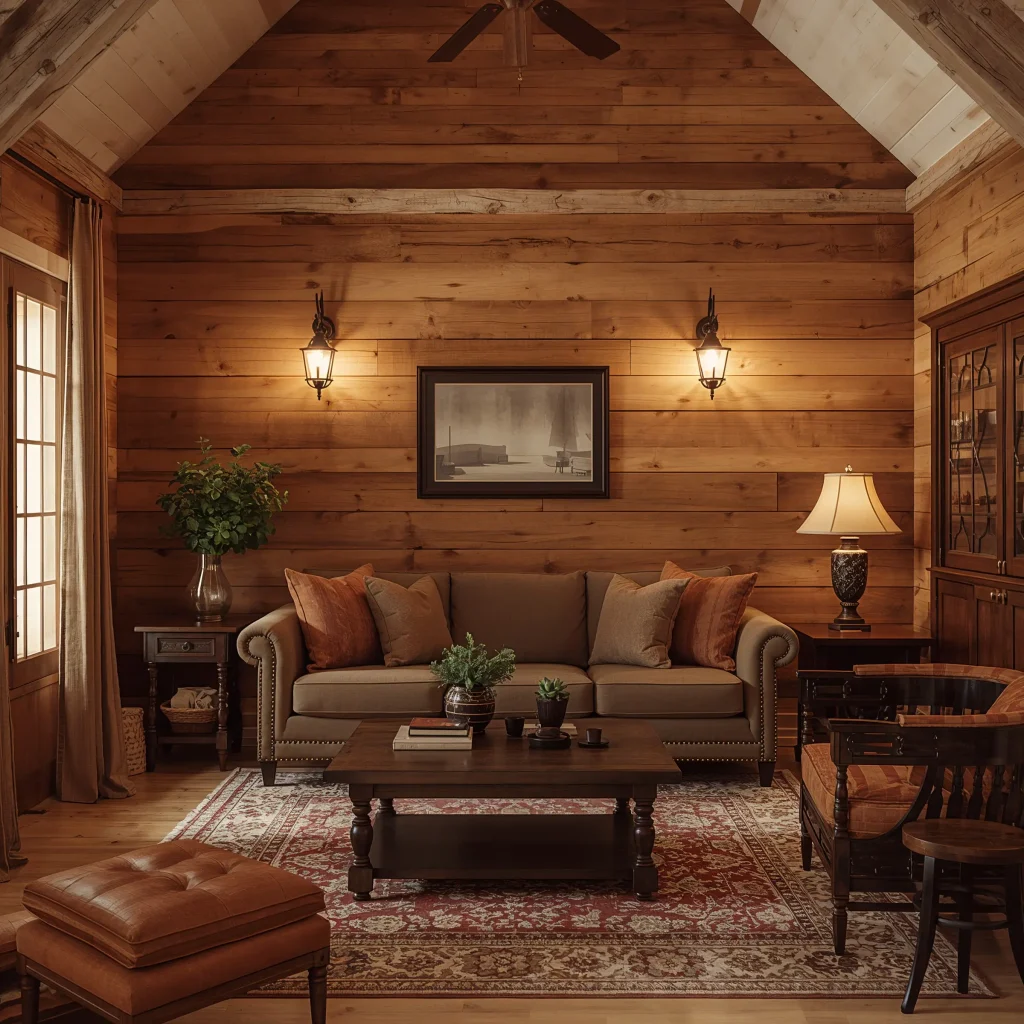
Nothing warms up a space quite like natural wood paneling. But we’re not talking about your grandpa’s basement wood panels. Modern rustic panels bring organic texture without the cabin fever vibes.
I installed reclaimed barn wood as an accent wall behind my TV. The varied tones and natural imperfections add character that pristine walls could never achieve. Plus, it hides all those ugly cables 🙂
DIY Installation Tips
Going the DIY route? Here’s what I learned:
- Acclimate the wood to your room for 48 hours first
- Use construction adhesive AND nails for security
- Start from the center and work outward for symmetry
Mix wood tones for authenticity. Real barn wood isn’t uniform – it’s weathered, varied, and imperfect. That’s the beauty of it. If you’re using new wood, distress it with sandpaper and stain for that authentic rustic look.
LED Light Strip Accent Walls
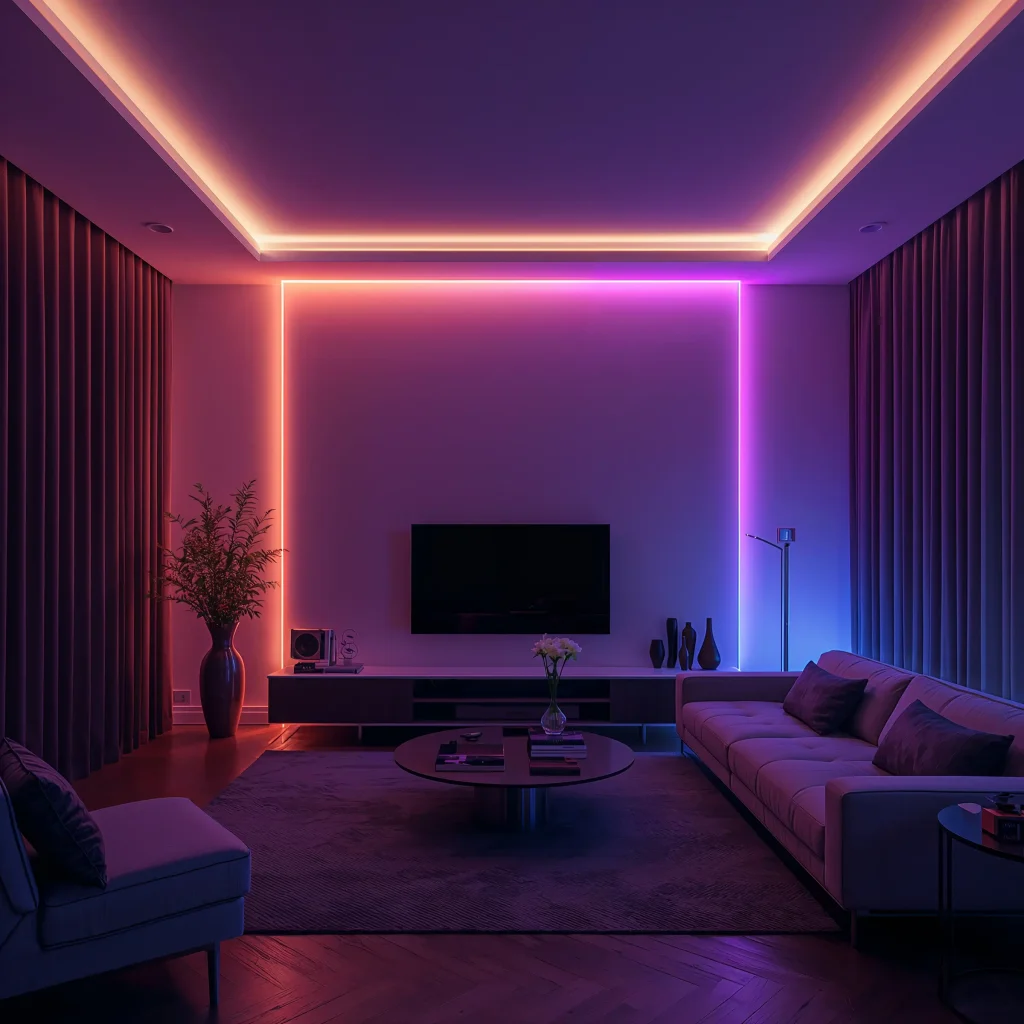
Who says art needs to be physical? LED light strips create customizable art that changes with your mood. IMO, this is the most underrated wall decor option out there.
My LED setup runs behind floating shelves and along the ceiling line, creating this ambient glow that makes everything look expensive. The color-changing feature means I can go from warm white for dinner parties to purple for movie nights.
Installation Without the Electrical Degree
LED strips are surprisingly DIY-friendly:
- Clean surfaces thoroughly before applying
- Plan your route to hide connections
- Use aluminum channels for a professional look
Get strips with a remote or app control. Being able to dim lights or change colors from your couch is peak lazy luxury. Just avoid going full rainbow disco unless that’s actually your vibe.
Wall Decals or Sticker Patterns
Renters, rejoice! Wall decals give you the impact of wallpaper without the commitment or damage. Modern decals look nothing like those cheesy quotes from 2010.
I used geometric triangle decals to create an accent pattern behind my reading chair. Total time: two hours. Total damage to walls: zero. My landlord loves me, and my walls look designer.
Application for Perfection
The key to professional-looking decals:
- Clean walls with rubbing alcohol first
- Use a credit card to smooth out bubbles
- Start from the top and work down
Create patterns with individual shapes rather than buying pre-made designs. You’ll get a custom look that nobody else has. Mix sizes of the same shape for organic patterns that feel intentional but not rigid.
Wrapping It Up
There you have it – fifteen ways to turn those blank walls into something worth looking at. The best part? You don’t need to do all of them. Pick one or two ideas that resonate with your style and start there.
Remember, your walls should tell YOUR story, not look like a furniture store display. Mix personal items with store-bought pieces. Combine different techniques. Break some rules. The worst thing that can happen? You take it down and try something else.
Wall decor isn’t permanent, but living with blank walls feels like it lasts forever. So grab a hammer, order some frames, or string up those lights. Your living room walls are waiting for their glow-up, and now you’ve got fifteen ways to make it happen. What are you waiting for?