
15 Creative Wall Decor Ideas for Cozy Home Vibes
You know that feeling when you walk into your room and those blank walls just stare back at you? Yeah, me too. After moving into my new apartment last year, I spent weeks living with bare walls that made my place feel about as cozy as a hospital waiting room. Trust me, I’ve tried everything from command strips disasters to hammer-and-nail catastrophes, and I’m here to share what actually works.
Let’s talk about 15 wall decor ideas that won’t make you want to tear your hair out or empty your bank account. These aren’t your typical Pinterest-perfect suggestions that require an art degree and unlimited funds – these are real, doable options that actually look good.
Gallery Wall with Mixed Frames
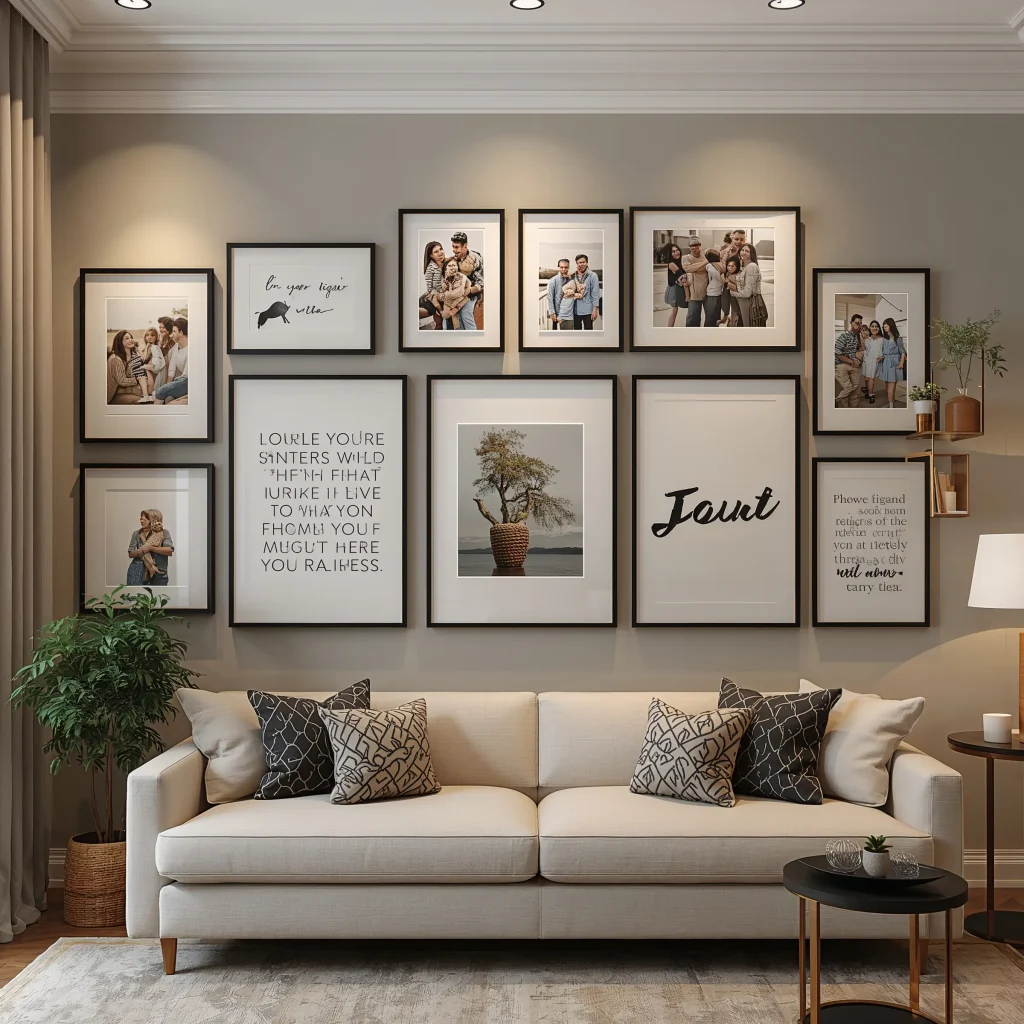
Remember when everyone thought matching frames were the only way to go? Thank goodness we’ve moved past that snooze-fest. Creating a gallery wall with mixed frames has become my absolute favorite way to display memories without looking like I raided a corporate office supply closet.
I started my gallery wall with three thrift store frames – one ornate gold baroque disaster, a sleek black modern piece, and a weathered wood frame that looked like it survived the Titanic. Sounds like a mess, right? Wrong. The trick is finding a common thread that ties everything together. For me, it’s the color palette of the photos and artwork inside the frames.
Here’s what works when mixing frames:
• Vary the sizes dramatically – think tiny 4x6s next to chunky 16x20s
• Mix materials like wood, metal, and painted frames
• Include unexpected shapes – circles and hexagons break up the rectangle monotony
• Keep spacing consistent (about 2-3 inches between frames)
• Start with paper templates before hammering any nails
The beauty of mixed frames? You can build your collection slowly without breaking the bank. Hit up garage sales, thrift stores, and even dollar stores. FYI, some of my best frames came from estate sales where I paid maybe $2 each.
Planning Your Layout
Don’t just start hammering away like I did the first time (RIP, security deposit). Cut paper templates in your frame sizes and tape them to the wall first. Move them around until you find an arrangement that doesn’t make your eye twitch. Trust me on this one – it’ll save you from a wall that looks like Swiss cheese.
Floating Shelves with Decorative Accents
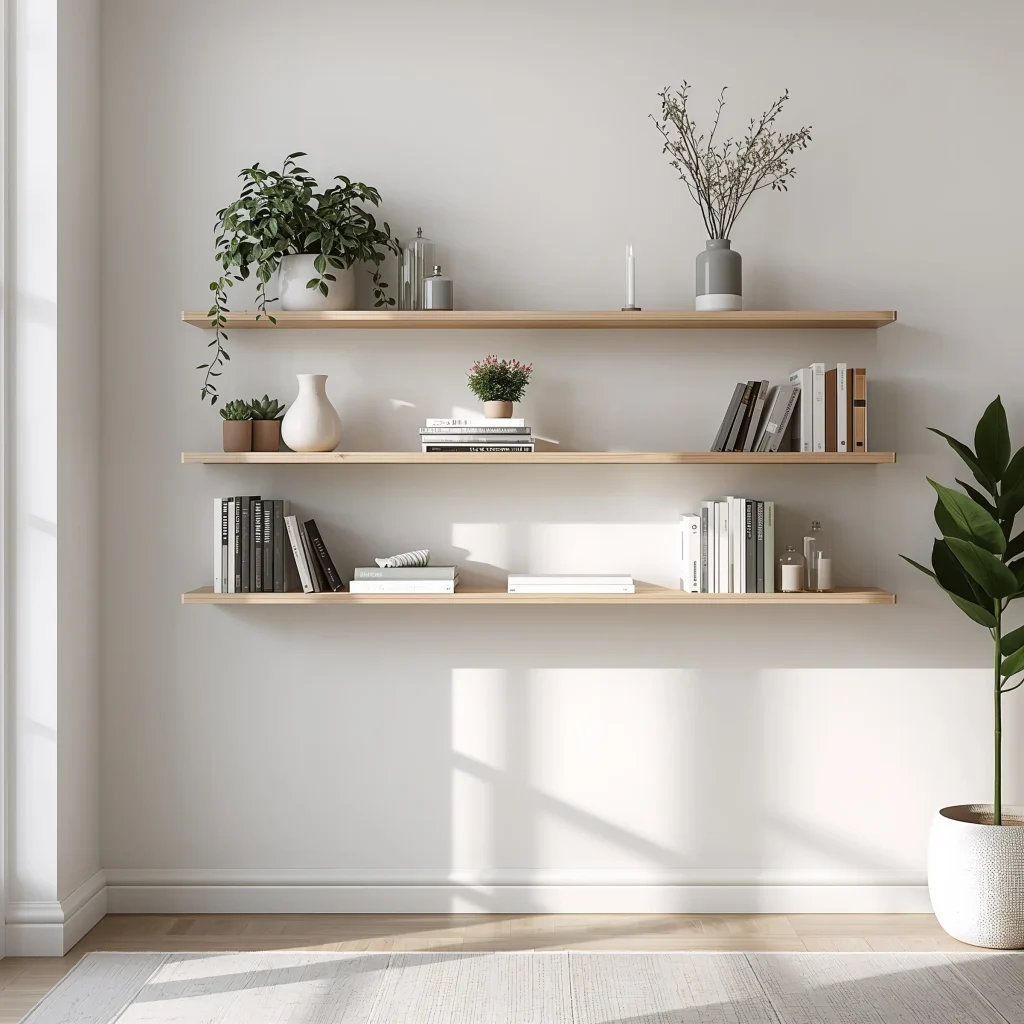
Who decided walls could only hold flat things? Floating shelves changed the game for me when I realized I could display my growing succulent collection without sacrificing precious floor space. Plus, they’re perfect for those of us who can’t commit to permanent decor.
Installing floating shelves scared me at first – I mean, the word “floating” doesn’t exactly scream structural integrity, does it? But once I got the hang of finding studs (the wall kind, unfortunately), these shelves became my go-to solution for practically everything.
What to Display on Floating Shelves
Here’s where people usually mess up – they treat floating shelves like a junk drawer in 3D. Don’t do that. Instead, think of each shelf as a curated mini-exhibition. I rotate my shelf displays seasonally:
• Small potted plants mixed with books
• Vintage cameras alongside modern geometric sculptures
• Candles of varying heights with small framed photos
• Collected pottery pieces with dried flowers
• Mini LED string lights woven between objects for ambiance
The golden rule? Follow the rule of odds – group items in threes or fives for visual appeal. And please, leave some breathing room. Your shelves shouldn’t look like they’re gasping for air.
Minimalist Geometric Wall Art
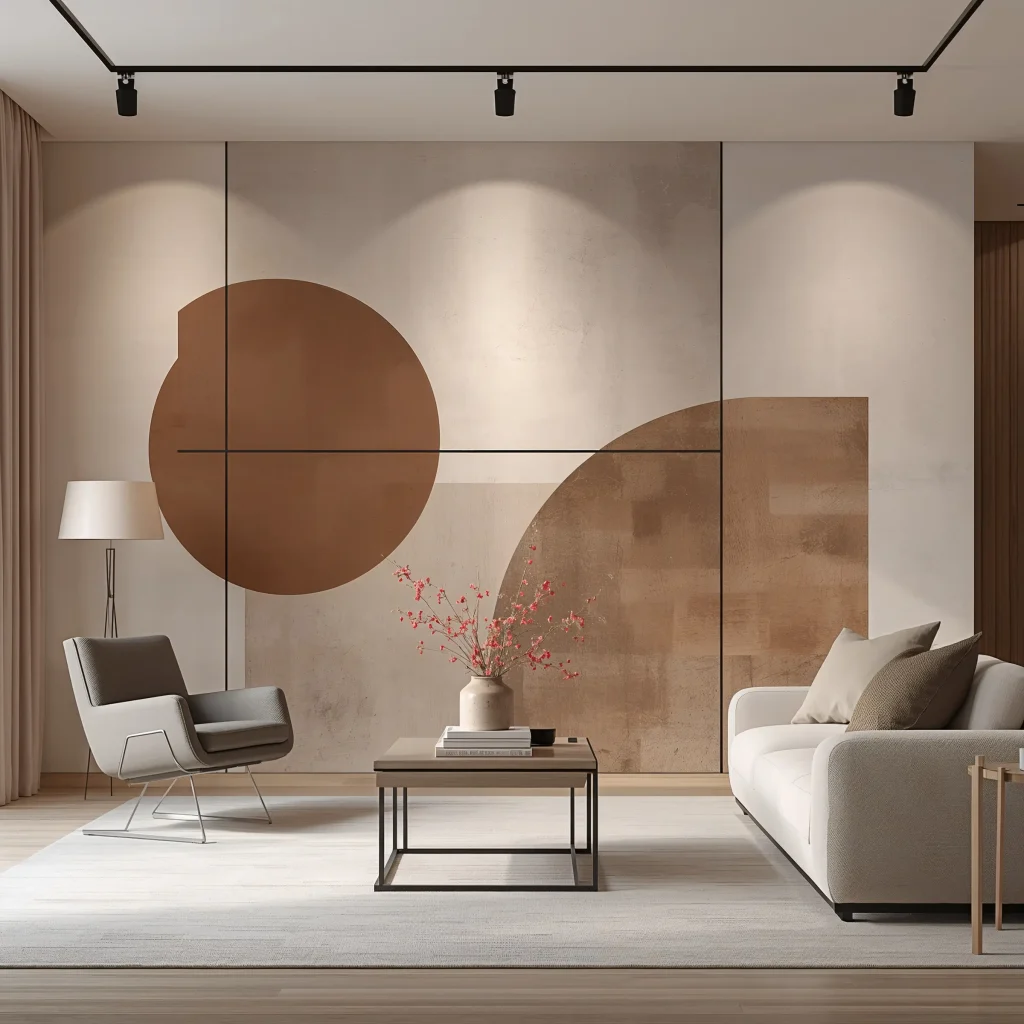
Sometimes less really is more, especially when your landlord has strict rules about wall modifications. Minimalist geometric wall art saves the day when you want something sophisticated without the visual chaos. I discovered this style after my maximalist phase left me feeling like I lived inside a kaleidoscope.
Creating geometric art doesn’t require artistic talent – shocking, I know. I’ve made stunning pieces using nothing but painter’s tape and leftover paint samples. Seriously, those free paint chips from hardware stores? Gold mine for geometric art projects.
DIY Geometric Designs That Actually Look Professional
Want to know a secret? Most of those expensive geometric prints you see online cost about $5 to make yourself. Here’s my foolproof method:
Start with a blank canvas or even sturdy cardboard covered in white paper. Use painter’s tape to create your design – triangles, hexagons, whatever speaks to you. Paint between the tape lines with contrasting colors (I’m partial to black, white, and one bold accent color). Peel off the tape while the paint’s still slightly wet for crisp lines.
The best part about geometric art? Mistakes just add character. That slightly wonky triangle? It’s “intentionally asymmetric” now.
Also Read: 15 Stunning Mid Century Modern Dining Room Ideas for Inspiration
Macrame Wall Hangings
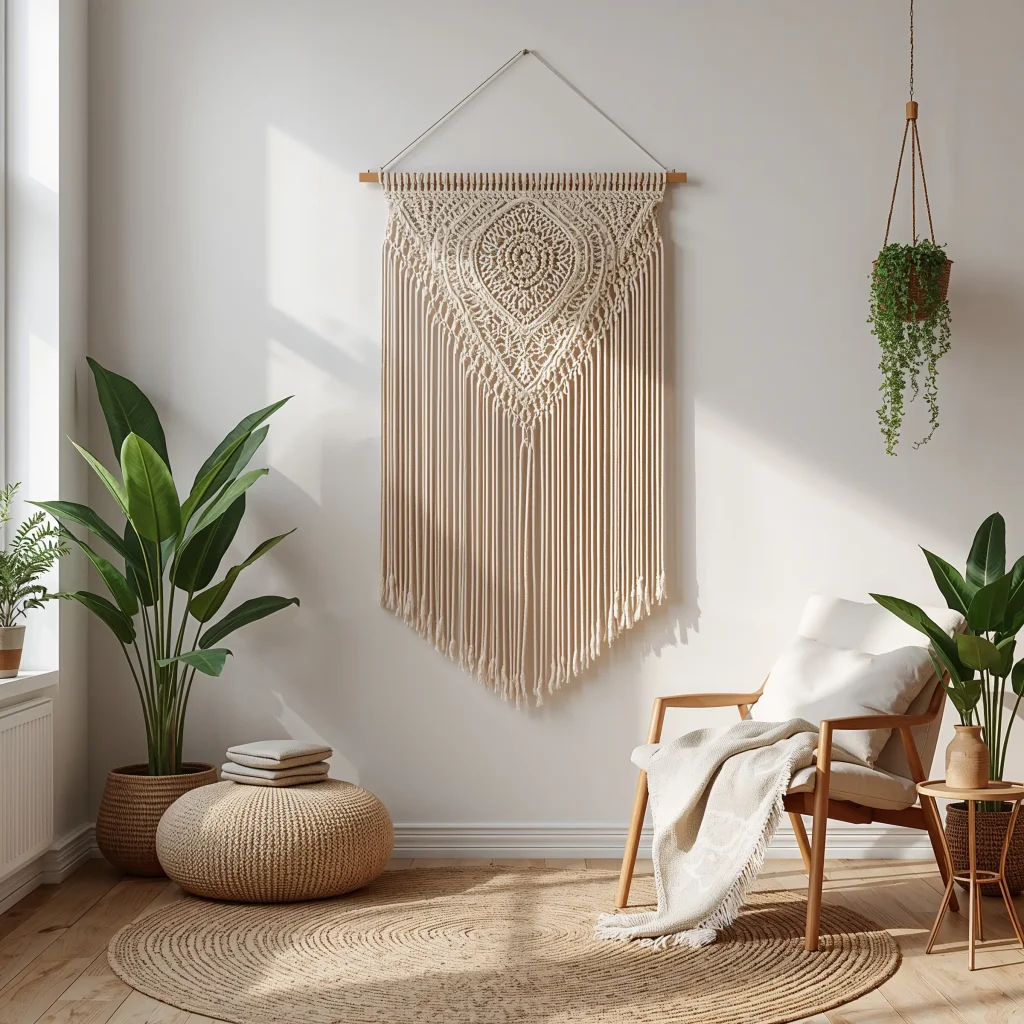
Okay, hear me out before you roll your eyes at the mention of macrame. Yes, it screams 1970s, but modern macrame wall hangings have evolved beyond your grandmother’s plant holders. Today’s designs range from subtle minimalist pieces to elaborate wall-spanning installations.
I fought the macrame trend hard until I saw a piece at a friend’s place that looked more like abstract textile art than hippie nostalgia. Turns out, macrame works exceptionally well in breaking up hard lines in modern spaces. Who knew?
Choosing the Right Macrame Style
Not all macrame is created equal. Skip the brown jute nightmares and opt for:
• Natural cotton rope in cream or white for versatility
• Geometric patterns over elaborate fringe forests
• Single statement pieces rather than multiple small ones
• Designs that incorporate wooden dowels or copper pipes
• Pieces that complement, not dominate, your existing decor
The texture macrame adds to a room is unmatched. It softens harsh walls and adds warmth without requiring electricity or maintenance. Plus, it’s practically indestructible – perfect for high-traffic areas.
Large Statement Canvas Painting

Sometimes you need to go big or go home. A single large canvas painting can transform an entire room faster than you can say “focal point.” I learned this after spending months trying to fill a massive wall with tiny prints that looked like postage stamps in comparison.
Here’s the thing about large canvas art – it doesn’t have to cost a fortune. I’ve created stunning statement pieces for under $50 using blank canvases from craft stores during sales. The key is confidence in simplicity. Abstract designs work beautifully at large scales because imperfections become intentional artistic choices.
Size Matters (But So Does Placement)
Ever walked into a room where the art feels off but you can’t pinpoint why? It’s usually hung too high. The center of your canvas should sit at eye level (roughly 57-60 inches from the floor). For pieces above furniture, leave 6-8 inches of breathing room between the furniture top and canvas bottom.
Large canvases work best when they’re:
• At least 2/3 the width of the furniture below them
• Centered on the wall or deliberately off-center
• The only major art piece on that wall
• Lit properly (track lighting or picture lights make a huge difference)
Vertical Plant Wall Display
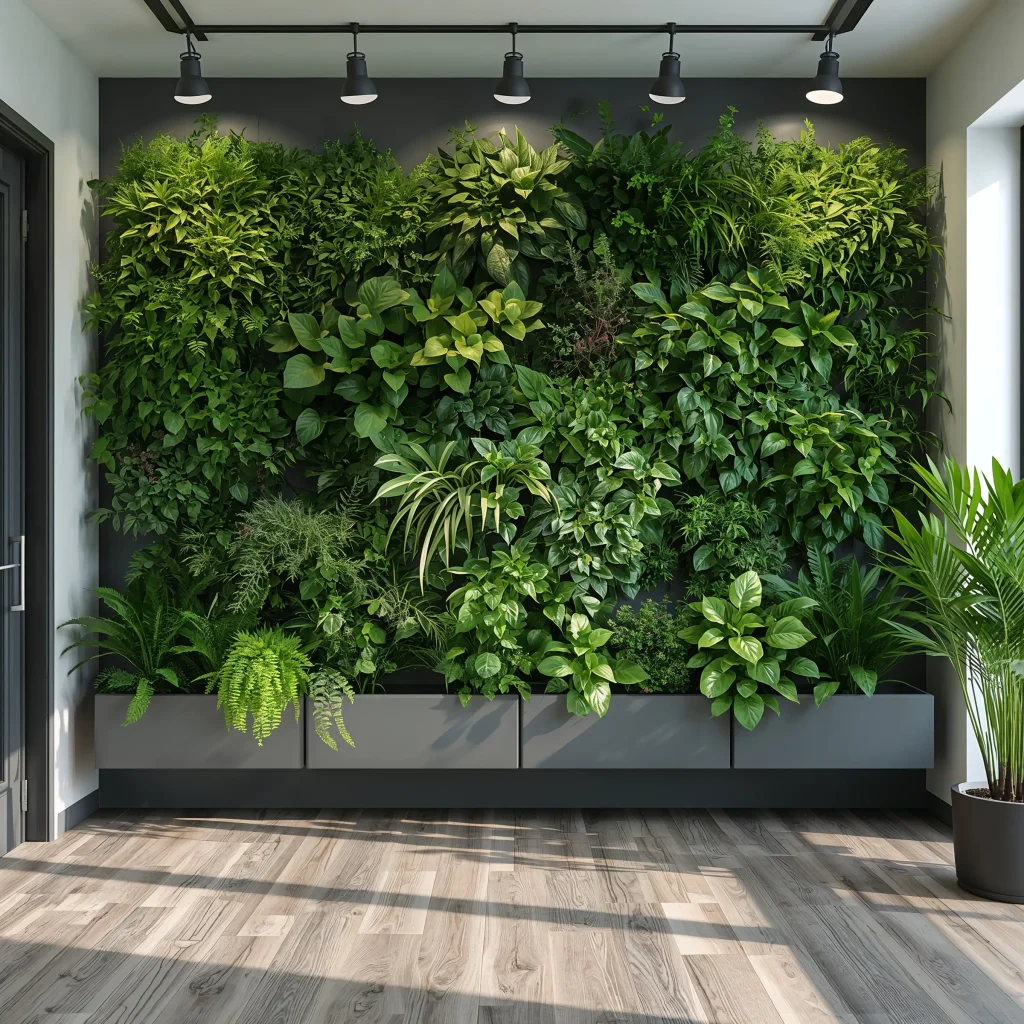
Plants on walls? Absolutely. Vertical plant displays turned my tiny apartment into what my friends now call “the urban jungle.” The best part? You don’t need a green thumb to pull this off – trust me, I’ve killed more plants than I care to admit.
Creating a plant wall starts with choosing the right system. Wall-mounted planters, hanging pockets, or trellis systems all work, depending on your commitment level and wall situation. I started with simple wall-mounted planters from IKEA and gradually expanded as my confidence (and plant survival rate) grew.
Best Plants for Vertical Displays
Not every plant enjoys defying gravity. Stick with these reliable options:
• Pothos (virtually indestructible)
• Spider plants (they actually thrive on neglect)
• Air plants (no soil required!)
• Small succulents (drought-tolerant = forgiving)
• Trailing philodendrons (gorgeous cascading effect)
Pro tip: Mix real and high-quality fake plants if you’re nervous about maintenance. Nobody needs to know that perfect string of pearls is actually plastic 🙂
Also Read: 15 Beautiful Green Dining Room Ideas and Elegant Inspirations
DIY Photo Collage Wall

Forget those cheesy photo collage apps – a physical photo collage wall brings personality to your space like nothing else. Mine started as a temporary solution after a trip but became the most complimented feature in my apartment.
The secret to a photo collage that doesn’t look like a teenager’s bedroom? Consistent photo treatment. Print everything in black and white, or use the same filter on all color photos. This creates cohesion even when the photos themselves are wildly different.
Creating Visual Flow in Your Collage
Random doesn’t mean chaotic. Your collage needs structure:
Start with a focal point – usually your largest or most meaningful photo. Build outward from there, balancing sizes and subjects. Mix close-ups with landscapes, people with places, color with black and white. Leave small gaps between photos for breathing room, but keep them consistent.
Consider these arrangement styles:
• Grid pattern for a clean, organized look
• Organic flow for a more casual vibe
• Themed sections (travel, family, friends)
• Chronological timeline along a hallway
• Shape-based (heart, initial letter, etc.)
Wall-Mounted Candle Holders
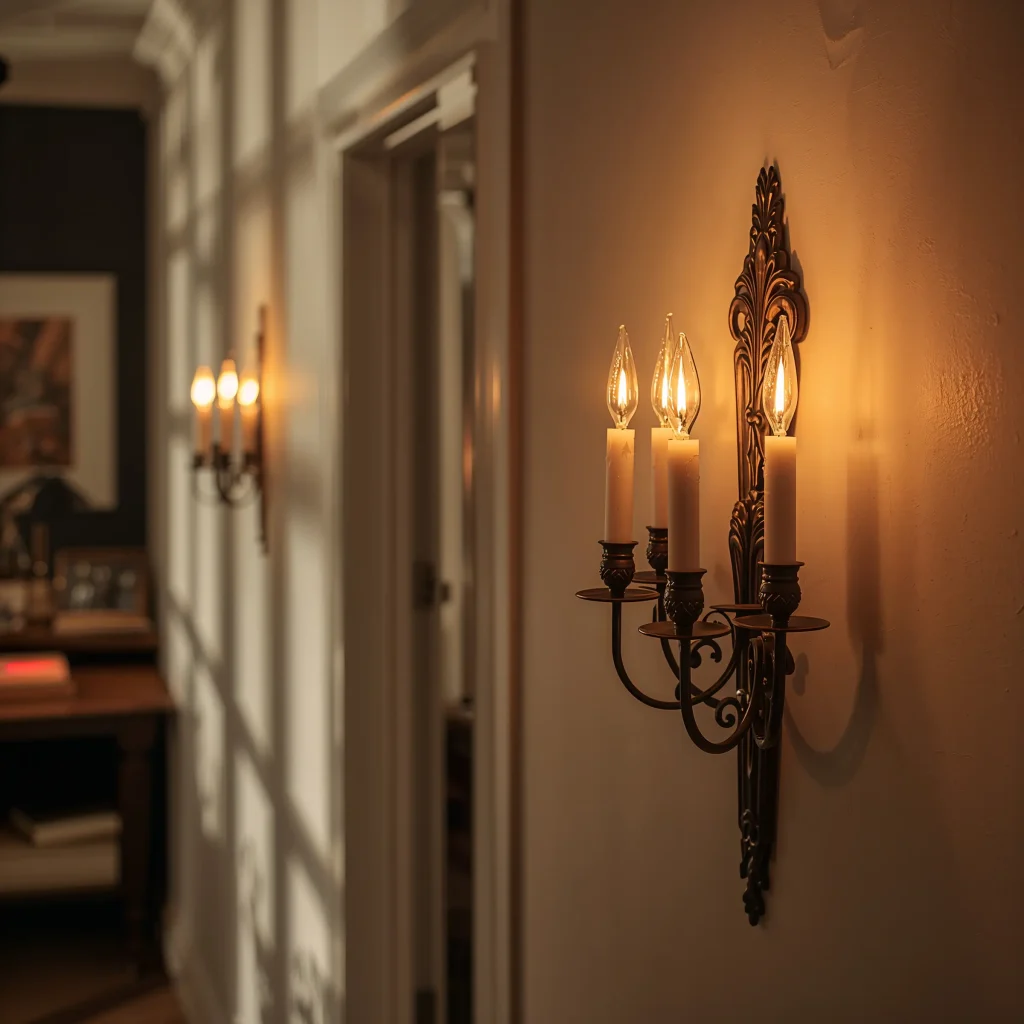
Nothing says ambiance quite like flickering candlelight on walls. Wall-mounted candle holders took my living room from “nice” to “is this a boutique hotel?” faster than you can light a match. Plus, they’re perfect for renters who can’t install permanent light fixtures.
I discovered wall-mounted candle holders during a power outage that lasted three days. What started as necessity became an obsession with creating the perfect mood lighting. Modern holders range from minimalist metal sconces to elaborate vintage-inspired pieces.
Safety First (Because Nobody Wants to Explain Fire Damage)
Real candles on walls require respect:
• Install holders at least 12 inches below ceilings
• Keep them away from curtains and fabric
• Use LED candles for worry-free ambiance
• Choose holders with protective glass or shields
• Never leave real candles unattended (obviously)
The placement matters too. Symmetrical arrangements on either side of artwork or mirrors create instant sophistication. Staggered heights along a stairway? Pure magic.
Vintage Wall Mirrors Collection
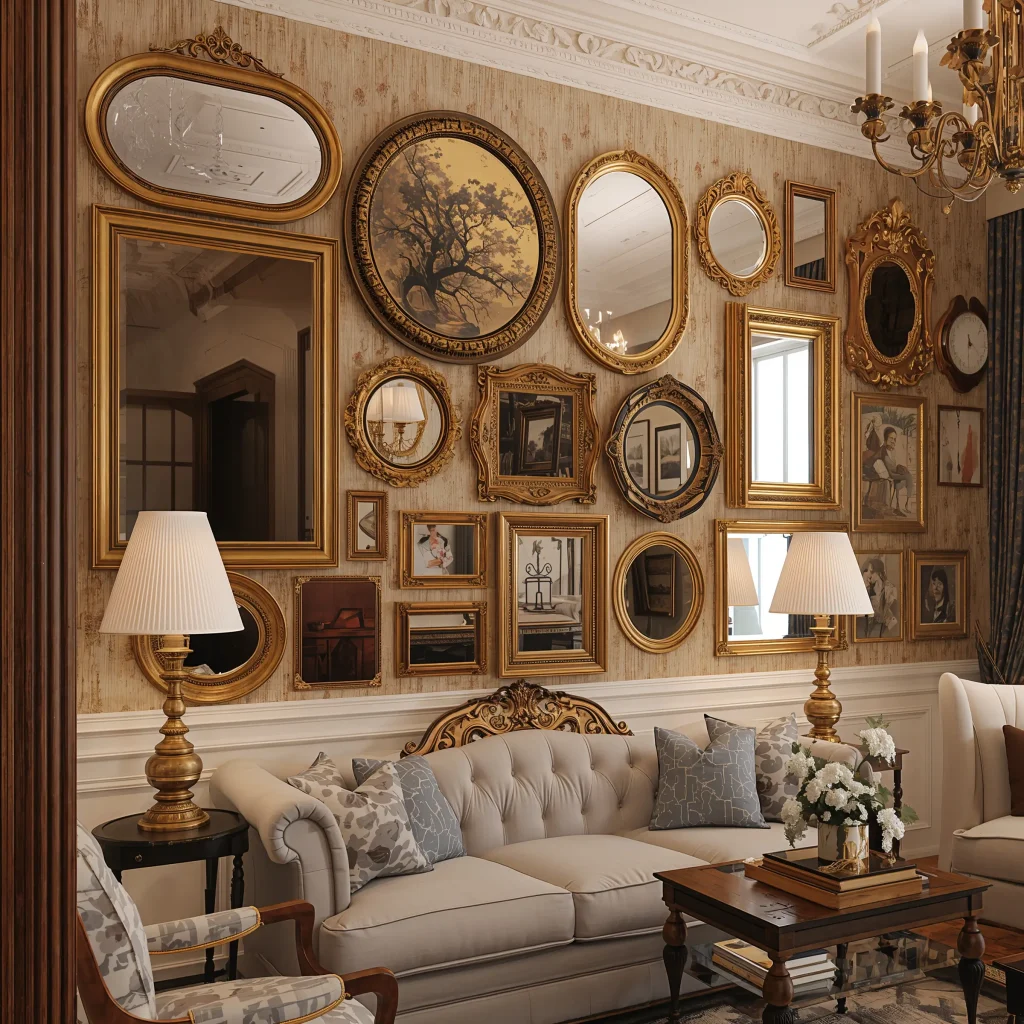
Mirrors do more than show you that piece of spinach in your teeth. A vintage mirror collection transforms walls while making spaces feel twice their actual size. After living in a cave-like studio apartment, mirrors became my best friends for bouncing light around.
Building a mirror collection doesn’t happen overnight. I started with one ornate find from an estate sale and slowly added pieces that caught my eye. The trick is mixing styles while maintaining some common element – similar frame colors, comparable levels of ornateness, or consistent shapes.
Strategic Mirror Placement for Maximum Impact
Hanging mirrors randomly is like wearing all your jewelry at once – overwhelming and ineffective. Consider these strategies:
• Opposite windows to double natural light
• Behind light sources to amplify illumination
• In narrow hallways to create width illusion
• Grouped in odd numbers for visual interest
• At varying heights for dynamic displays
My favorite trick? Lean an oversized vintage mirror against the wall instead of hanging it. Instantly adds casual elegance without commitment (or wall damage).
Also Read: 15 Gorgeous Formal Dining Room Ideas and Luxe Designs
3D Wall Panels with Texture

Flat walls are so last decade. 3D wall panels add depth and interest that paint alone could never achieve. When I first saw textured panels at a boutique hotel, I assumed they cost thousands. Turns out, you can transform a wall for less than a nice dinner out.
Modern 3D panels come in everything from geometric patterns to organic waves. Installation scared me initially – it seemed like something requiring professional help. But most panels use simple adhesive or click systems that even I could handle without calling my handy friend for rescue.
Choosing the Right Texture and Pattern
Your panel choice sets the room’s entire mood:
• Geometric patterns for modern, contemporary spaces
• Wave patterns for calming, spa-like vibes
• Brick or stone textures for industrial charm
• Wood-look panels for warmth without maintenance
• Abstract designs for artistic flair
Remember, you don’t need to cover entire walls. A single accent section behind a bed or sofa creates stunning focal points without overwhelming the space or budget.
Bohemian Tapestry Decor

Tapestries aren’t just for college dorms anymore. Bohemian tapestries offer instant wall coverage with zero commitment – perfect for renters or the chronically indecisive (guilty as charged). My first tapestry purchase happened out of desperation to hide an unfortunate paint color choice, but it became a design element I genuinely loved.
The key to adult tapestry use? Quality and intentional placement. Skip the thin, printed fabrics and invest in woven or embroidered pieces with actual texture. These feel like art, not bed sheets tacked to walls.
Hanging Tapestries Like a Grown-Up
Thumbtacks are not your friend here. Proper tapestry display requires:
• Wooden dowels or curtain rods for top support
• Velcro strips for secure, damage-free mounting
• Proper stretching to eliminate wrinkles
• Strategic lighting to highlight textures
• Complementary decor that doesn’t compete
IMO, tapestries work best as standalone statement pieces rather than background decoration. Give them space to breathe and shine.
Chalkboard or Whiteboard Wall
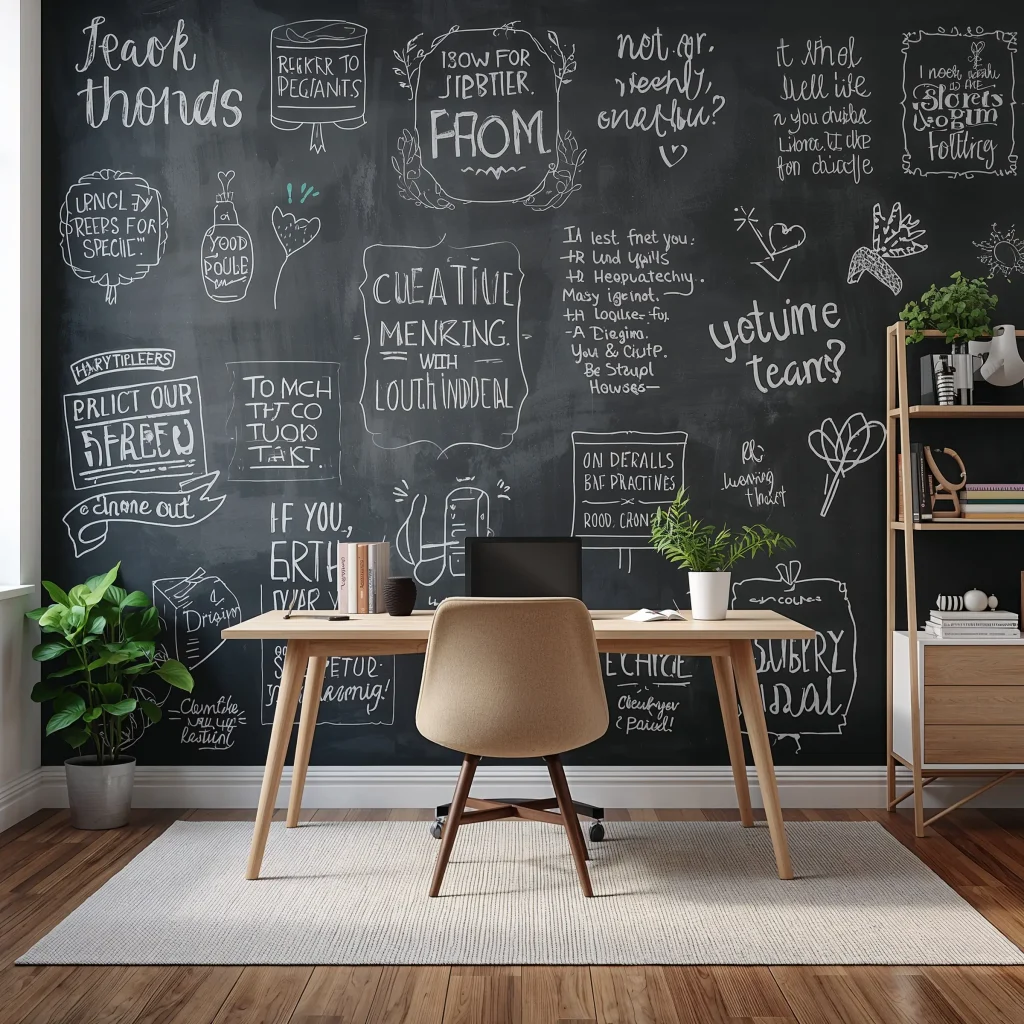
Who says walls can’t be functional? Creating a chalkboard or whiteboard wall turned my home office from chaos central to productivity paradise. Plus, it’s the only decor that changes whenever you want without spending extra money.
I went the chalkboard paint route after seeing those $500 custom boards online. For about $30 and an afternoon of painting, I got an entire wall of writeable surface. The satisfaction of crossing off to-do items directly on my wall? Priceless.
Making Functional Walls Look Intentional
The trick to functional wall decor is making it look deliberate, not desperate:
• Frame the painted area with molding for a finished look
• Use high-quality paint for smooth writing surfaces
• Incorporate colored chalk or markers strategically
• Create designated zones (calendar, lists, doodle space)
• Keep cleaning supplies nearby but hidden
Pro tip: Condition new chalkboard paint by rubbing chalk all over it and erasing before first use. Skip this step and you’ll have ghost writing forever.
Accent Wall with Bold Wallpaper
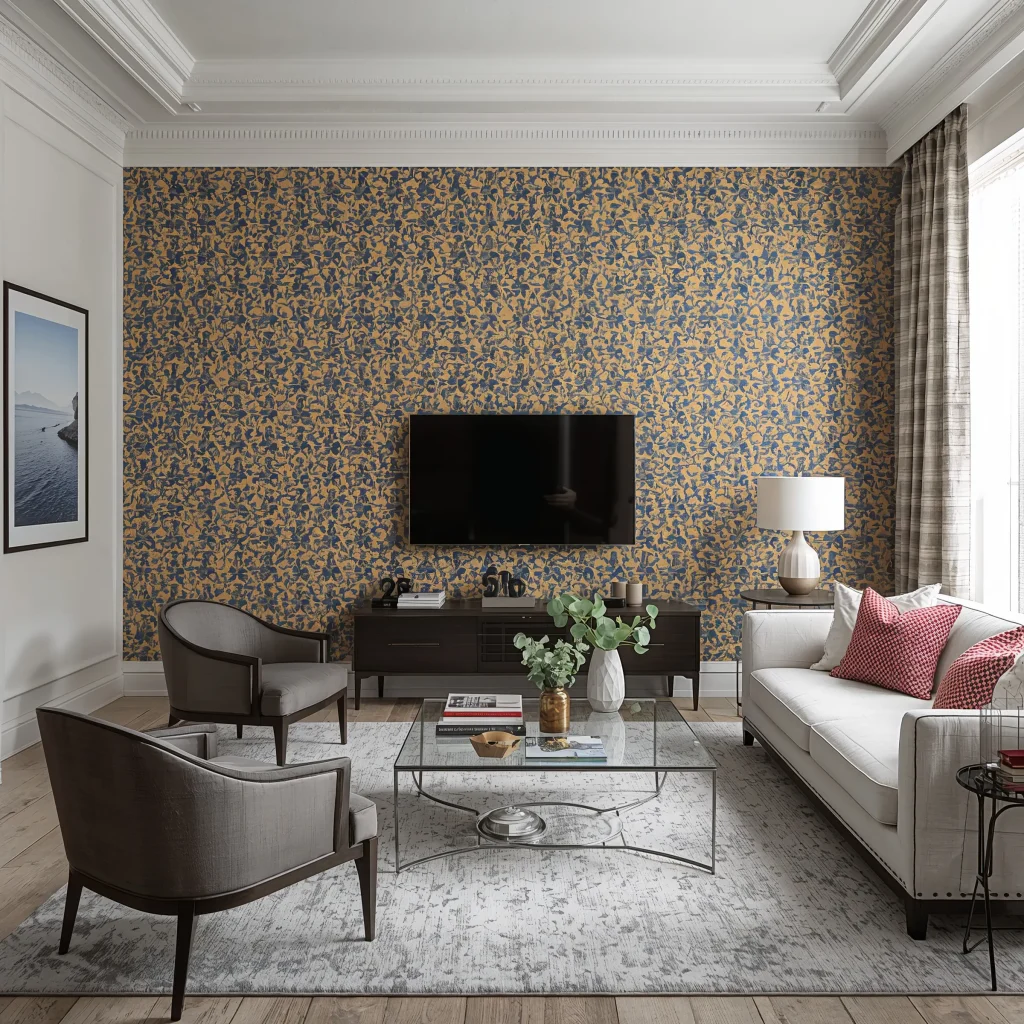
Paint is safe. Bold wallpaper is brave. After years of beige walls, I took the plunge with a geometric print that made my mother gasp. Best decision ever. The right wallpaper transforms a room from background to experience.
Modern wallpaper technology means you’re not committing to the next decade. Peel-and-stick options remove cleanly, making them perfect for commitment-phobes and renters. I’ve changed my bedroom wallpaper three times in two years without any wall damage.
Wallpaper Wisdom for First-Timers
Don’t make my rookie mistakes:
• Order samples first – colors look different in person
• Measure twice, order once (with 10% extra)
• Start with one accent wall, not entire rooms
• Match pattern repeats carefully at seams
• Use a smoothing tool to eliminate bubbles
Bold patterns work best when the rest of the room stays relatively neutral. Let the wallpaper be the star, not compete in a visual shouting match.
String Art Wall Design
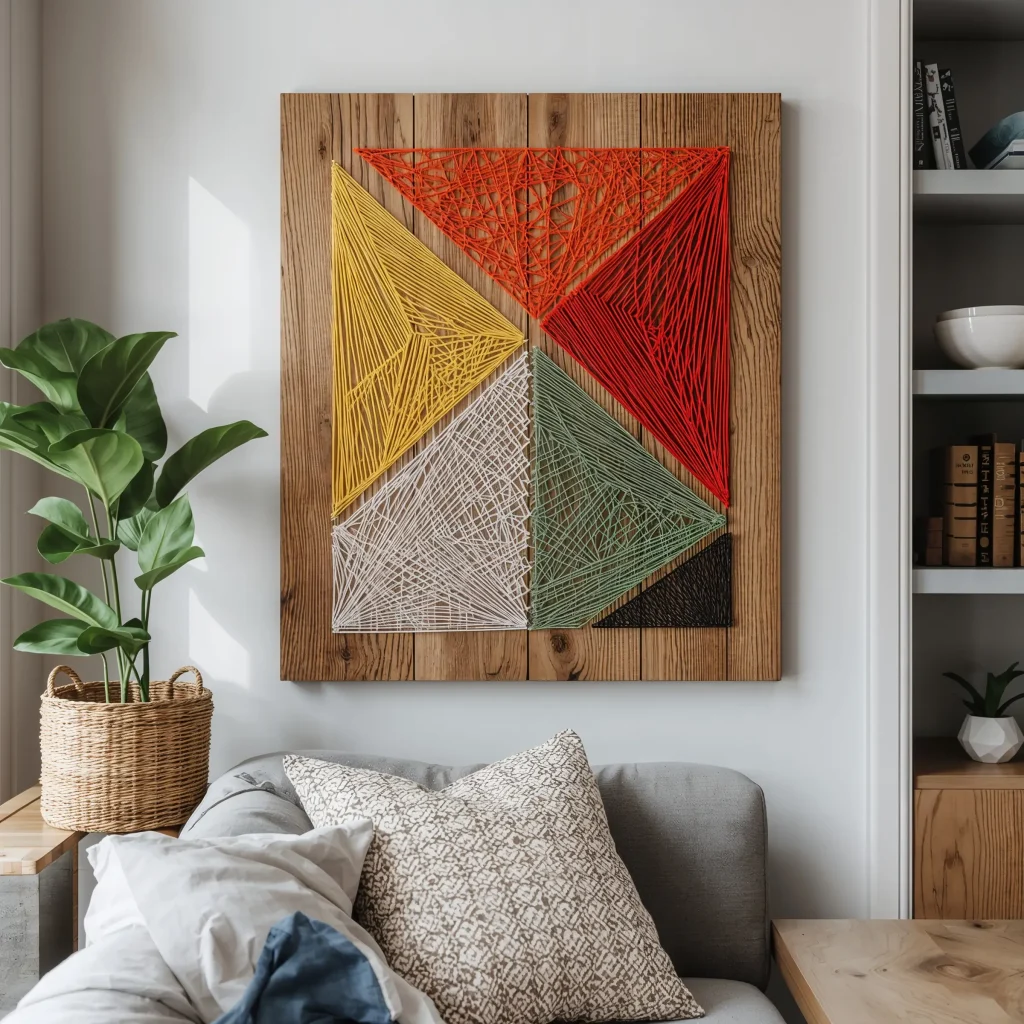
Remember making string art in elementary school? The grown-up version creates stunning geometric designs that look like they belong in galleries. My first attempt looked like a spider’s web after a hurricane, but the second try? Chef’s kiss.
String art requires patience but rewards you with completely unique pieces. I love that no two designs turn out exactly the same. The materials cost practically nothing – wood, nails, and string – but the impact rivals expensive artwork.
Creating Professional-Looking String Art
Success lies in preparation:
• Use graph paper to plan your design
• Pre-drill holes for nail placement (trust me)
• Choose string weight appropriate to your scale
• Maintain consistent tension while wrapping
• Layer colors for depth and complexity
The best part? Mistakes become “artistic interpretation.” That slightly off-center heart? It has “organic charm” now.
Reclaimed Wood Wall Art Display

Nothing adds warmth quite like reclaimed wood art. After helping a friend demolish an old barn, I came home with enough weathered wood to create an entire gallery. The character in old wood can’t be replicated – each piece tells a story.
Creating reclaimed wood displays doesn’t require woodworking expertise. I started by simply arranging different pieces in geometric patterns and mounting them directly to the wall. The natural variations in color and texture do all the artistic heavy lifting.
Working with Reclaimed Materials
Before you go scavenging, know this:
• Clean thoroughly but gently to preserve patina
• Seal with clear coat to prevent splinters
• Check for pests before bringing wood indoors
• Mix wood types for visual interest
• Incorporate metal accents for contrast
My favorite technique? Creating abstract mountain ranges using different wood pieces cut at angles. Visitors always assume I bought it from some fancy artist. Nope, just me, a saw, and some old fence posts.
Bringing It All Together
So there you have it – 15 wall decor ideas that actually work in real homes with real budgets. The beauty of these options? You can mix and match them throughout your space. My apartment features a gallery wall in the living room, floating shelves in the bedroom, and a massive tapestry in the dining area. Each room has its own personality while maintaining a cohesive overall vibe.
Remember, the best wall decor reflects your personality, not what’s trending on social media. Start with one idea that speaks to you and build from there. Your walls shouldn’t stress you out – they should make you smile every time you walk into the room.
Take it from someone who’s made every wall decor mistake possible – the only real failure is leaving those walls blank. Pick an idea, grab some supplies this weekend, and transform those boring walls into something that actually feels like home. Your future self (and your Instagram feed) will thank you.