15 Charming Cozy Bedroom Aesthetic Fairy Lights Ideas for Home
Let me guess—you’ve been scrolling through Pinterest at 2 AM, falling deeper into the rabbit hole of dreamy bedroom aesthetics, and now you’re convinced your room desperately needs a fairy light makeover. Trust me, I’ve been there. Actually, I’m still there. My bedroom has gone through approximately seven different fairy light phases, and honestly, I regret nothing.
Here’s the thing about fairy lights: they’re the ultimate bedroom glow-up hack. They’re affordable, ridiculously easy to install, and they transform any space from “meh” to magical in about fifteen minutes.
Whether you’re going for that ethereal Tumblr vibe, a cozy hygge atmosphere, or something straight out of a fantasy novel, fairy lights have got your back.
So grab your favorite drink, get comfy, and let’s talk about fifteen absolutely gorgeous ways to incorporate fairy lights into your bedroom. I’ve tested most of these myself (my electricity bill can confirm), and I’m excited to share what actually works versus what just looks good in photos.
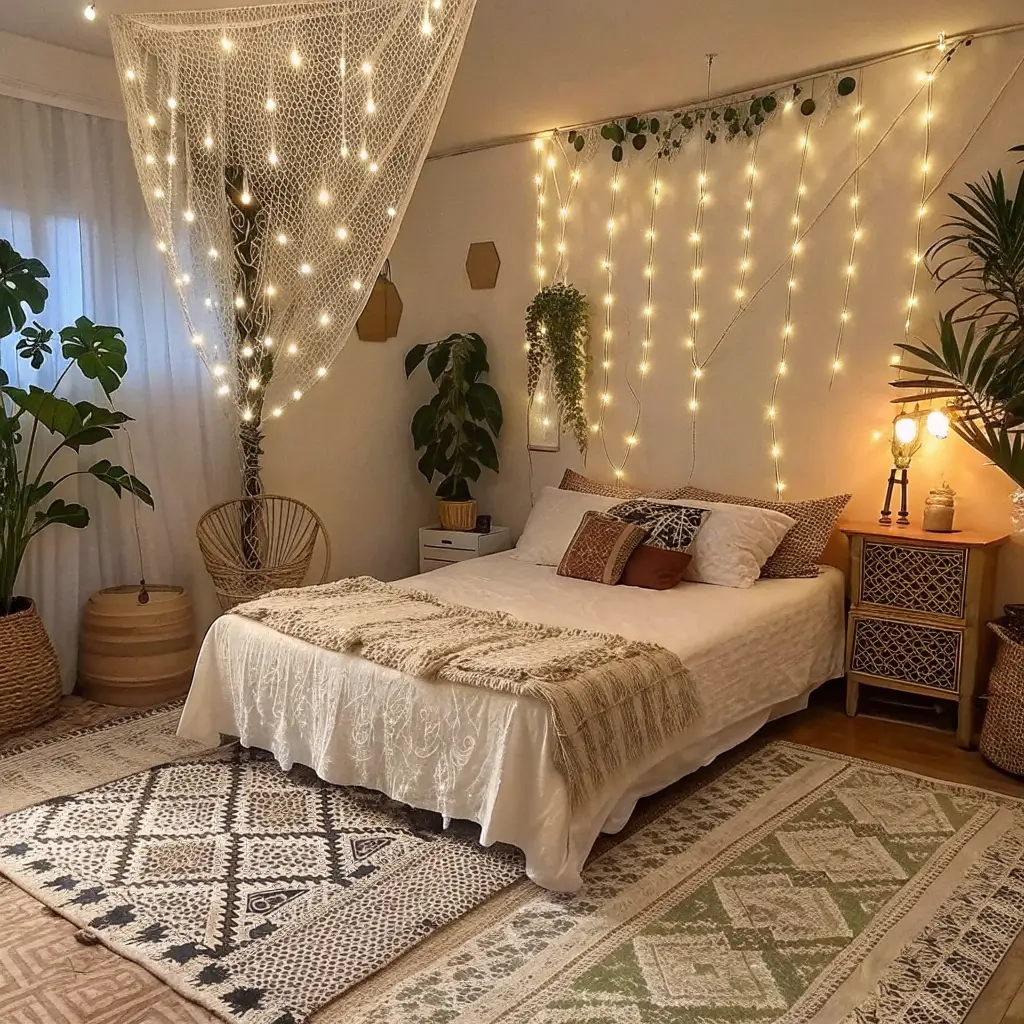
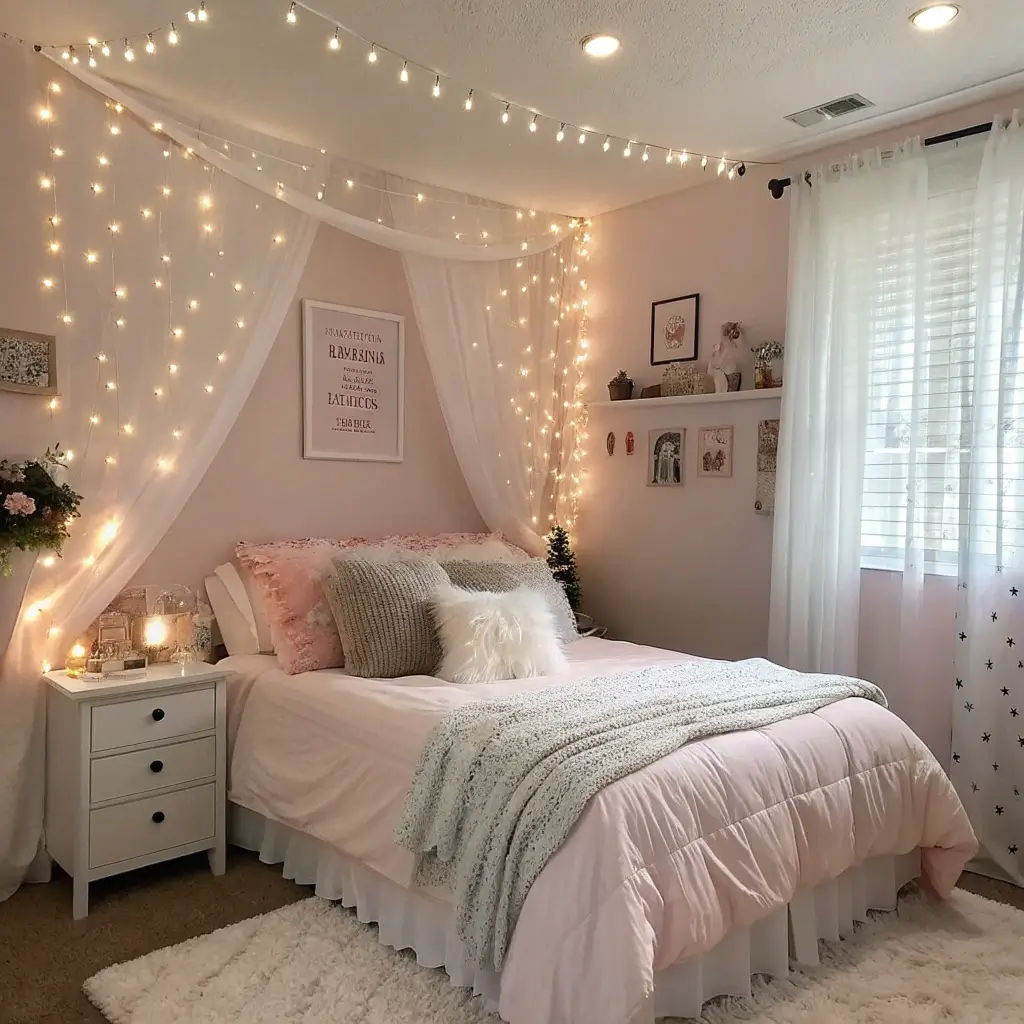
Fairy Light Canopy Over Bed
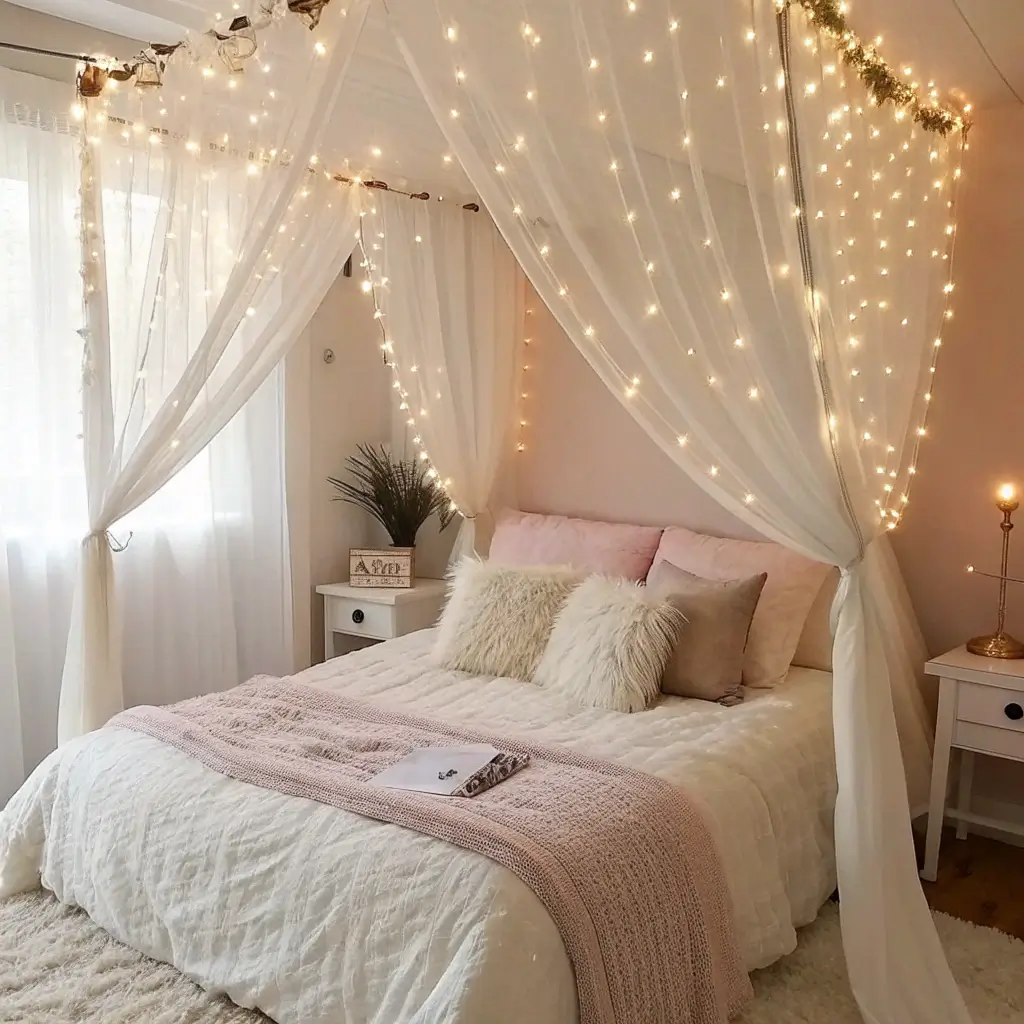
Ever walked into someone’s bedroom and felt like you stumbled into a magical forest clearing? Yeah, that’s the fairy light canopy effect, and it’s absolutely stunning.
The concept is simple but powerful: you create a cascading curtain of lights above your bed, turning your sleeping space into a cozy cocoon of twinkling warmth. The result? Every night feels like you’re falling asleep under a blanket of stars.
How to Create This Look
There are a few approaches here, depending on your commitment level and ceiling situation:
- Ceiling hooks method: Install small adhesive or screw-in hooks in a rectangular pattern above your bed, then drape fairy lights between them in gentle swoops
- Sheer fabric combo: Hang a lightweight canopy fabric first, then weave fairy lights through it for an extra dreamy effect
- Hoop method: Attach a large embroidery hoop or hula hoop to the ceiling and let lights cascade down from it like a waterfall
IMO, the sheer fabric combo creates the most Instagram-worthy results, but it requires a bit more effort. If you’re renting and can’t drill into your ceiling, command hooks work surprisingly well for lighter string lights.
Pro tip: Opt for warm white lights instead of cool white. The warm tones create that cozy, golden-hour atmosphere that makes you actually want to crawl into bed. Cool white lights can feel a bit clinical—like you’re trying to sleep in an operating room. Not exactly the vibe we’re going for here.
Cozy Corner Reading Nook with String Lights
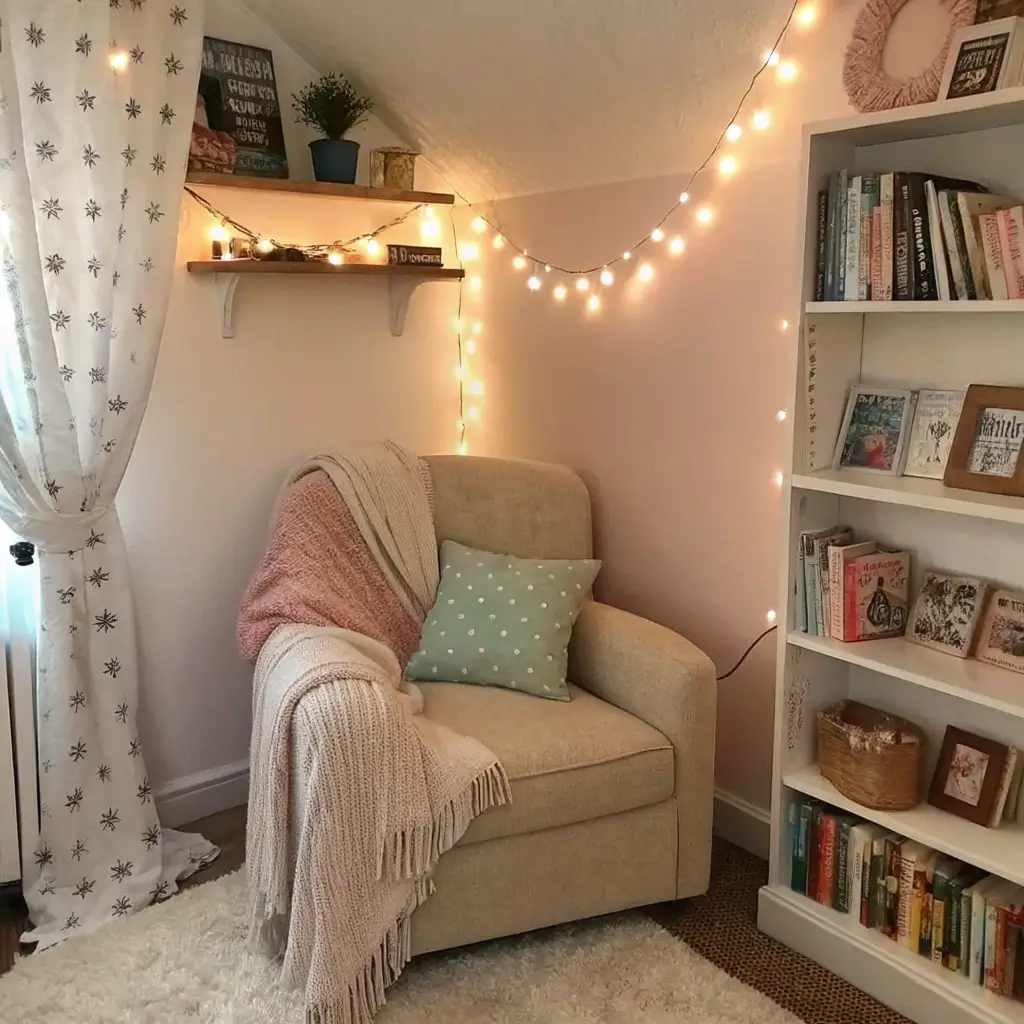
If you don’t have a dedicated reading corner in your bedroom, are you even living your best life? I’m only half joking. There’s something incredibly special about carving out a little sanctuary just for you and your books.
String lights absolutely elevate a reading nook from functional to fantastical. They provide just enough ambient lighting to read by without the harshness of overhead lights, and they make the whole setup feel intentional and magical.
Setting Up Your Illuminated Reading Space
Here’s what you’ll need to create this cozy situation:
- A comfortable chair, bean bag, or floor cushions (your back will thank you)
- Bookshelves or a small side table for your current reads
- Fairy lights draped along the wall, around shelving, or hung from above
- Soft textiles like throw blankets and pillows
- Maybe a small plant or two for that added life
The key is layering. Don’t just stick some lights on the wall and call it a day. Weave them through your bookshelf, let them trail along the floor, or spiral them around a nearby plant stand. The more organic and intentional the arrangement looks, the cozier the space feels.
I created a reading nook in the corner of my bedroom last winter, and honestly? It changed my relationship with reading. Something about that soft, twinkling glow makes you actually want to put down your phone and pick up a book. Revolutionary concept, I know 🙂
DIY Mason Jar Fairy Lights Decor
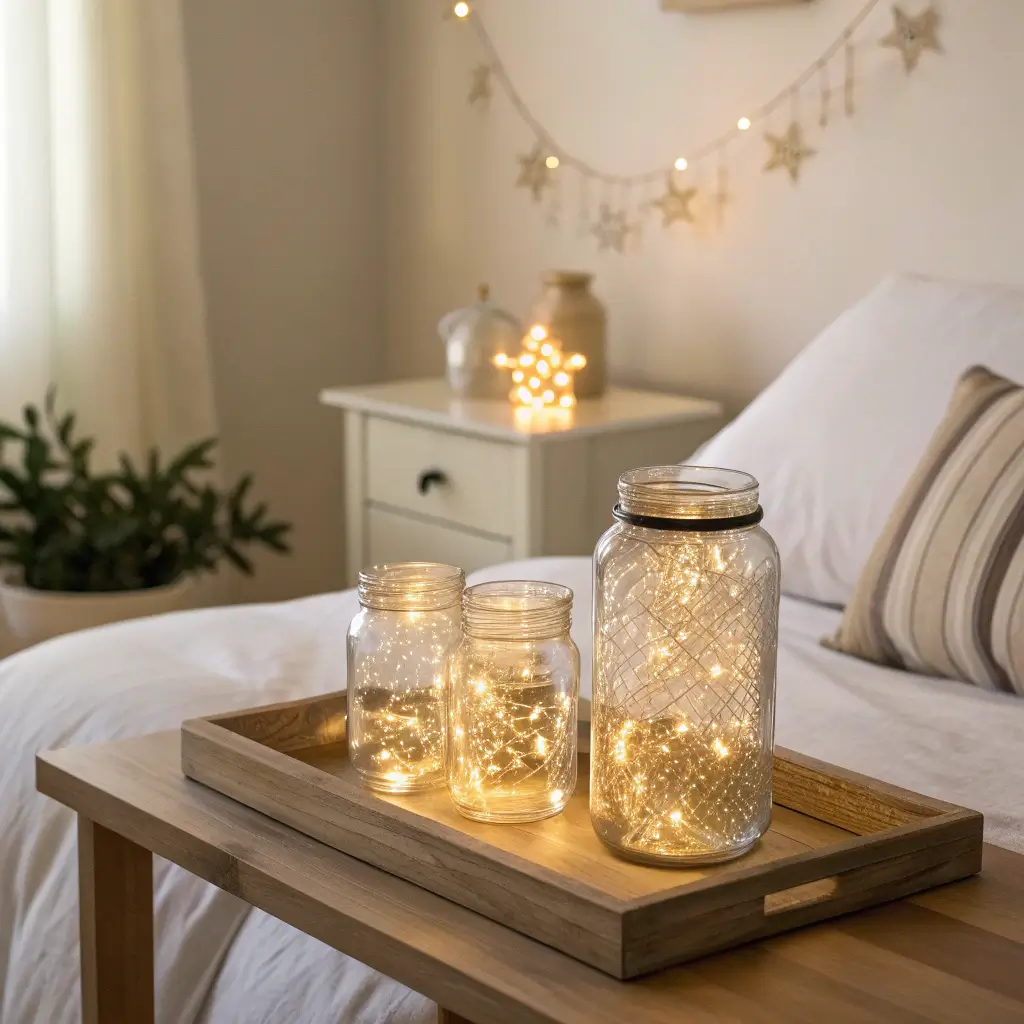
Okay, hear me out—I know mason jar crafts can feel a bit Pinterest-2015, but when done right, this trend absolutely holds up. There’s a reason it became so popular, and that reason is it looks gorgeous and costs almost nothing.
Mason jar fairy lights create these beautiful, contained clusters of light that work as standalone decor pieces or grouped together for maximum impact. Plus, they’re ridiculously portable, so you can move them around your bedroom whenever you feel like switching things up.
Creating Your Mason Jar Masterpieces
The basic version is almost embarrassingly simple:
- Get some mason jars (thrift stores usually have tons)
- Insert battery-operated fairy lights
- Arrange artistically
- Done. That’s literally it.
But if you want to level up, here are some variations:
- Frosted jars: Apply frosted glass spray paint for a softer, more diffused glow
- Painted jars: Use translucent paint in soft colors like blush pink or sage green
- Filled jars: Add sand, fake snow, dried flowers, or small crystals before inserting lights
- Hanging jars: Wrap wire around the jar necks and hang them at different heights
I’ve got three mason jar lights on my dresser right now—one filled with sea glass I collected on vacation, one with tiny pinecones, and one plain. They create this perfect little trio of ambient light that makes getting ready in the morning slightly less painful.
Warm White LED Wall Art
This idea blends functionality with aesthetics in the best possible way. Instead of just draping lights randomly, you use them to create intentional shapes, words, or patterns on your wall.
Think of it as creating your own custom neon sign, but softer, warmer, and way cheaper. You can spell out words, create geometric shapes, or even attempt more complex designs like constellations or flower outlines.
Design Ideas to Consider
Here are some directions you could take this:
- Words and phrases: “Dream,” “Stars,” “Love,” your name, song lyrics, or motivational quotes
- Geometric patterns: Triangles, hexagons, diamond shapes, or abstract line art
- Nature-inspired: Tree branches, mountains, moon phases, or simple flower shapes
- Constellation maps: Map out your zodiac constellation or a meaningful star pattern
The trick to making this look polished rather than chaotic is using small, clear adhesive clips to hold the wire in place precisely where you want it. Map out your design lightly in pencil first, then attach the clips along your lines before positioning the light strand.
Fair warning: this requires some patience. My first attempt at a geometric triangle pattern looked more like a drunk rectangle. My second attempt was much better. Practice on a piece of cardboard first if you’re nervous about committing to your wall.
Boho Bedroom with Hanging Lights
The bohemian aesthetic and fairy lights are basically soulmates. They complement each other so perfectly that I’m honestly surprised they haven’t made it official yet.
Boho style embraces warmth, texture, and eclectic combinations, and fairy lights fit seamlessly into this vibe. The key is making the lights look intentional but not too perfect—boho is about that effortlessly beautiful, slightly undone look.
Incorporating Lights Into Your Boho Haven
Here’s how to nail this aesthetic:
- Drape lights through macramé wall hangings for an instant boho upgrade
- Wrap lights around rattan furniture or woven baskets
- Combine lights with dried pampas grass and eucalyptus arrangements
- Create a light “curtain” behind your bed using copper wire lights
- Interweave lights with tapestries or textile wall art
The beauty of boho style is that it encourages mixing and layering. Don’t be afraid to combine different light sources—fairy lights on the wall, a Himalayan salt lamp on your nightstand, maybe some candles (the LED kind if you’re clumsy like me) scattered around.
Texture is your best friend here. Pair your twinkling lights with chunky knit blankets, woven baskets, and lots of plants. The contrast between the delicate lights and the natural, earthy textures creates that signature boho coziness.
Minimalist Bedroom Fairy Light Arrangement
“Wait,” you might be thinking, “fairy lights in a minimalist bedroom? Isn’t that contradictory?” I thought so too at first. But here’s the beautiful thing—fairy lights can actually enhance minimalism when used intentionally.
The key is restraint and purpose. Instead of going overboard with lights everywhere, you choose one focal point and execute it perfectly. Less really is more here.
Minimalist Lighting Approaches
Consider these cleaner, simpler arrangements:
- Single strand along one wall: Create a clean horizontal line just below ceiling height
- Outline your window frame: Simple, architectural, and purposeful
- Behind the headboard only: A subtle glow that adds warmth without visual clutter
- One statement jar or globe: A contained light source that feels intentional
For minimalist spaces, choose fairy lights with thin, nearly invisible wire (copper wire lights are perfect for this). The goal is for the light itself to be the statement, not the hardware.
Color temperature matters even more in minimalist spaces. Stick with warm white—it softens the often-stark minimalist aesthetic without contradicting it. And please, for the love of good design, hide any visible battery packs or cords. Nothing kills minimalist vibes faster than tangled wires.
Also Read: 15 Affordable Bedroom Inspo Aesthetic Ideas You’ll Love
Starry Night Ceiling Lights Idea
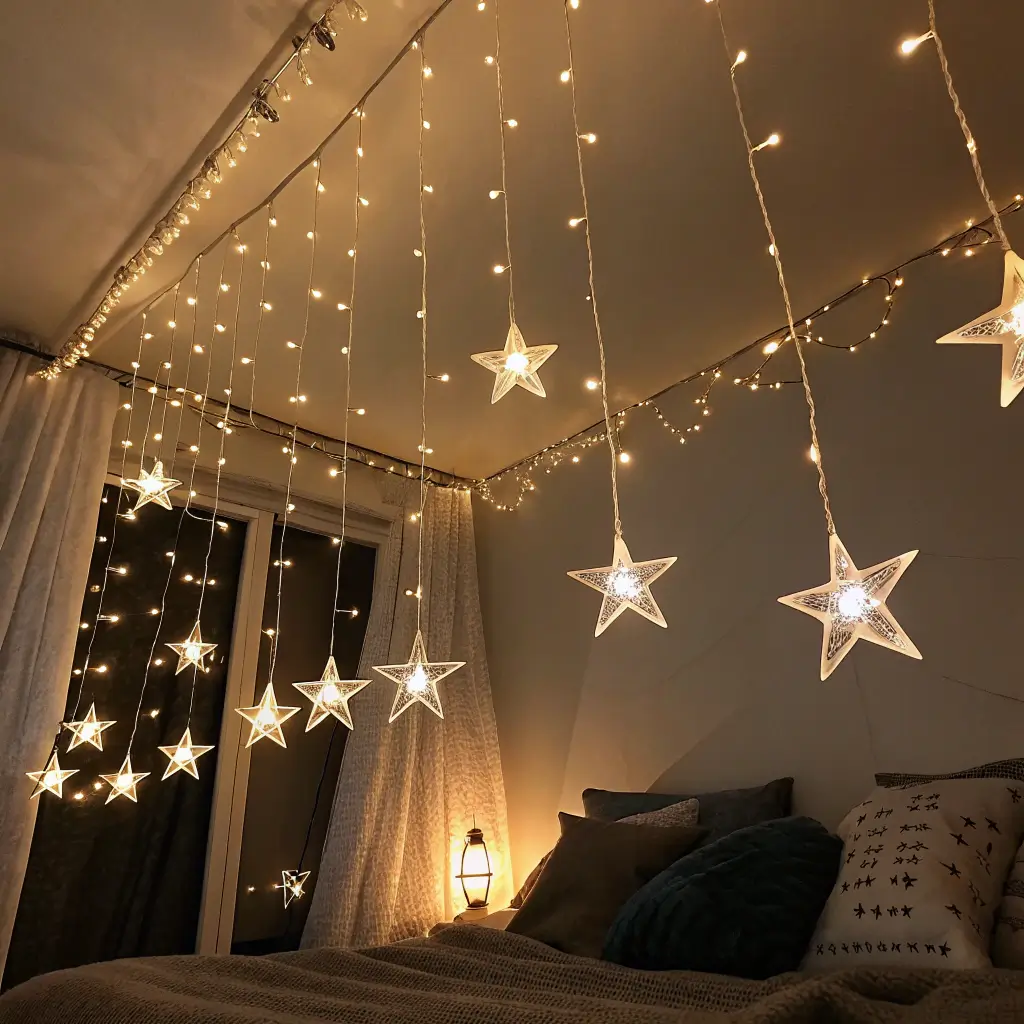
This one requires a bit more commitment, but the payoff is absolutely spectacular. Imagine lying in bed and looking up at your very own starry sky. Sounds dreamy, right? Because it is.
Creating a starry night ceiling transforms your bedroom into something magical—like sleeping under the open sky without the bugs, cold, or existential dread of actual camping.
Methods for Your Indoor Night Sky
There are several approaches, ranging from simple to elaborate:
- Basic method: Use adhesive clips to attach fairy lights directly to your ceiling in random, star-like patterns
- Fiber optic approach: Install fiber optic lights through small holes in your ceiling (more permanent but incredibly realistic)
- Sheer fabric canopy: Stretch dark fabric across your ceiling and poke lights through at irregular intervals
- LED star projector combo: Combine actual fairy lights with a star projector for maximum cosmic effect
FYI, the sheer fabric method is my personal favorite for renters. You can use thumbtacks or removable hooks to secure dark blue or black tulle to your ceiling, then push fairy lights through the fabric wherever you want “stars” to appear.
Make it more realistic by varying the spacing—real stars aren’t evenly distributed. Cluster some lights together and leave other areas darker. You can even use different brightness levels if you’re feeling extra dedicated.
Fairy Lights Around Mirror Frame
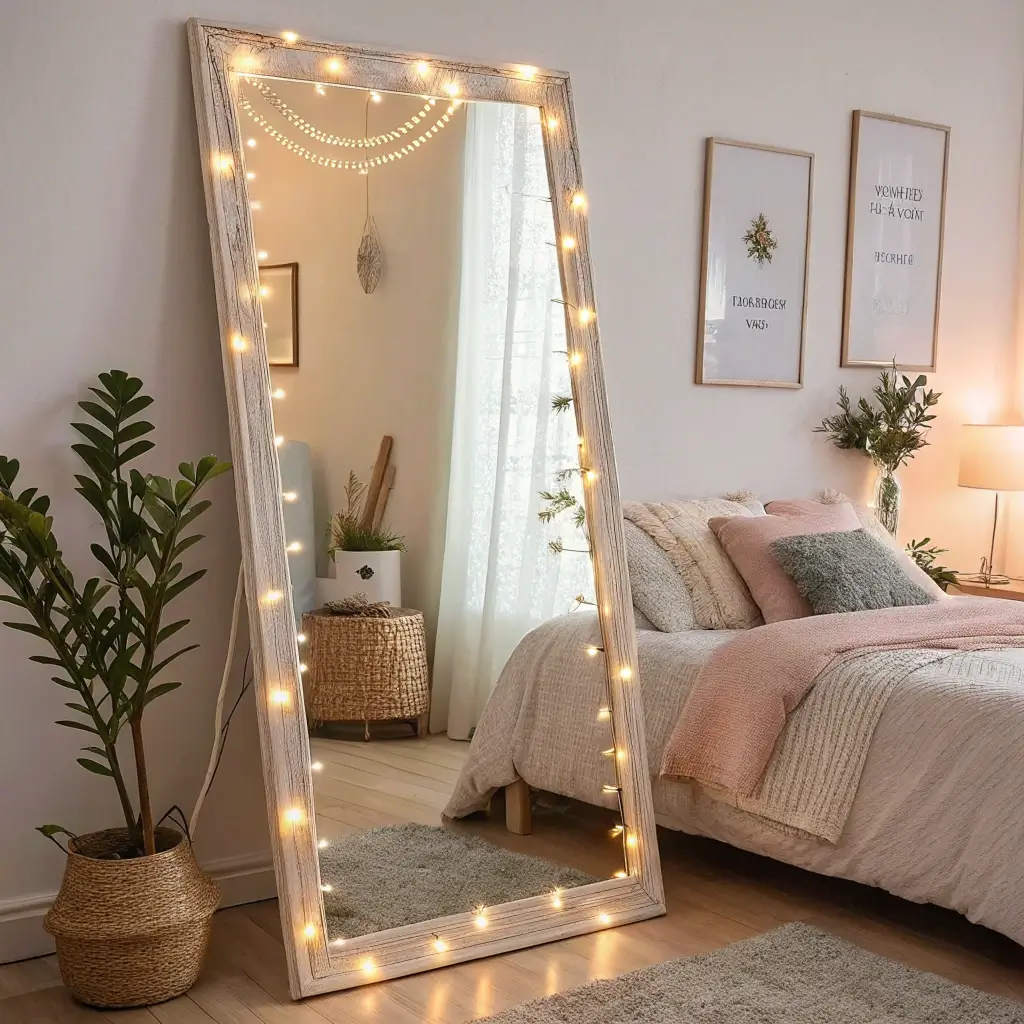
Here’s a classic that never gets old. Fairy lights around a mirror create that perfect Hollywood-style vanity glow, but without the harshness of traditional vanity lighting.
This setup is both functional and beautiful—you get flattering, even lighting for getting ready, plus a gorgeous decorative element that makes your mirror an actual focal point.
Achieving the Perfect Mirror Glow
Different mirror shapes call for slightly different approaches:
- Round mirrors: Wrap lights around the entire circumference for a halo effect
- Rectangular mirrors: Outline the frame completely, or just do the top and sides
- Vintage or ornate frames: Weave lights through the decorative details
- Frameless mirrors: Use adhesive clips to attach lights directly to the mirror’s edge
Warm white lights are essential here unless you want to look slightly deceased every time you check your reflection. Warm tones are universally flattering and give your skin a healthy glow. Cool white lights, on the other hand, highlight every imperfection and make you question all your life choices at 7 AM.
I’ve had lights around my bedroom mirror for years now, and getting ready genuinely feels more luxurious. There’s something about that soft glow that makes the morning routine feel less like a chore and more like a ritual.
Rustic Bedroom Fairy Light Setup

Rustic bedrooms already have that warm, inviting quality, and fairy lights amplify it beautifully. The combination of natural materials with twinkling lights creates a cabin-in-the-woods feeling, even if you’re in a city apartment.
The rustic aesthetic embraces imperfection and natural elements, which means your fairy light arrangement doesn’t need to be precise. In fact, a slightly undone, organic look works best here.
Rustic Light Arrangement Ideas
Here’s how to incorporate lights into your rustic space:
- Wrap lights around exposed wood beams (real or faux)
- Drape lights through antler decor or driftwood pieces
- Place lights inside vintage lanterns or wooden crates
- Weave lights through wrought iron bed frames or headboards
- Combine with burlap, plaid, and natural fiber textiles
Edison-style LED fairy lights are perfect for rustic bedrooms. They have that vintage, industrial feel while still providing the warm, ambient glow you want. Copper wire lights also work beautifully against natural wood tones.
Consider combining your fairy lights with other rustic lighting elements—a wrought iron table lamp, some vintage-style lanterns, or even a small fireplace if you’re lucky enough to have one. Layered lighting is key to that cozy, cabin-like atmosphere.
Also Read: 15 Cool Aesthetic Posters for Bedroom Ideas and Perfect Wall Art
Curtain String Lights for Window Glow

This idea is simple but absolutely stunning, especially after dark. Curtain lights hang vertically like a waterfall of light, creating a magical backdrop for any window.
The effect transforms your window into a statement piece, visible both from inside and outside your room. It’s like having your own personal light show every night.
Installing Your Light Curtain
Here’s what you need to know:
- Choose the right size: Measure your window width and height to ensure proper coverage
- Mounting options: Use a tension rod across the window frame, adhesive hooks, or a small curtain rod
- Layer with actual curtains: Sheer curtains in front of the lights soften the glow beautifully
- Consider timer plugs: Set your lights to turn on automatically at dusk and off at bedtime
Curtain lights come in various styles—some have straight vertical strands, others have a cascading “waterfall” effect where strands vary in length. The waterfall style tends to look more organic and interesting, especially in larger windows.
One thing I love about this setup is how it looks from outside. Walking up to my house at night and seeing that warm glow through the bedroom window genuinely makes me happy. It’s like my room is saying “welcome home” before I even get through the door.
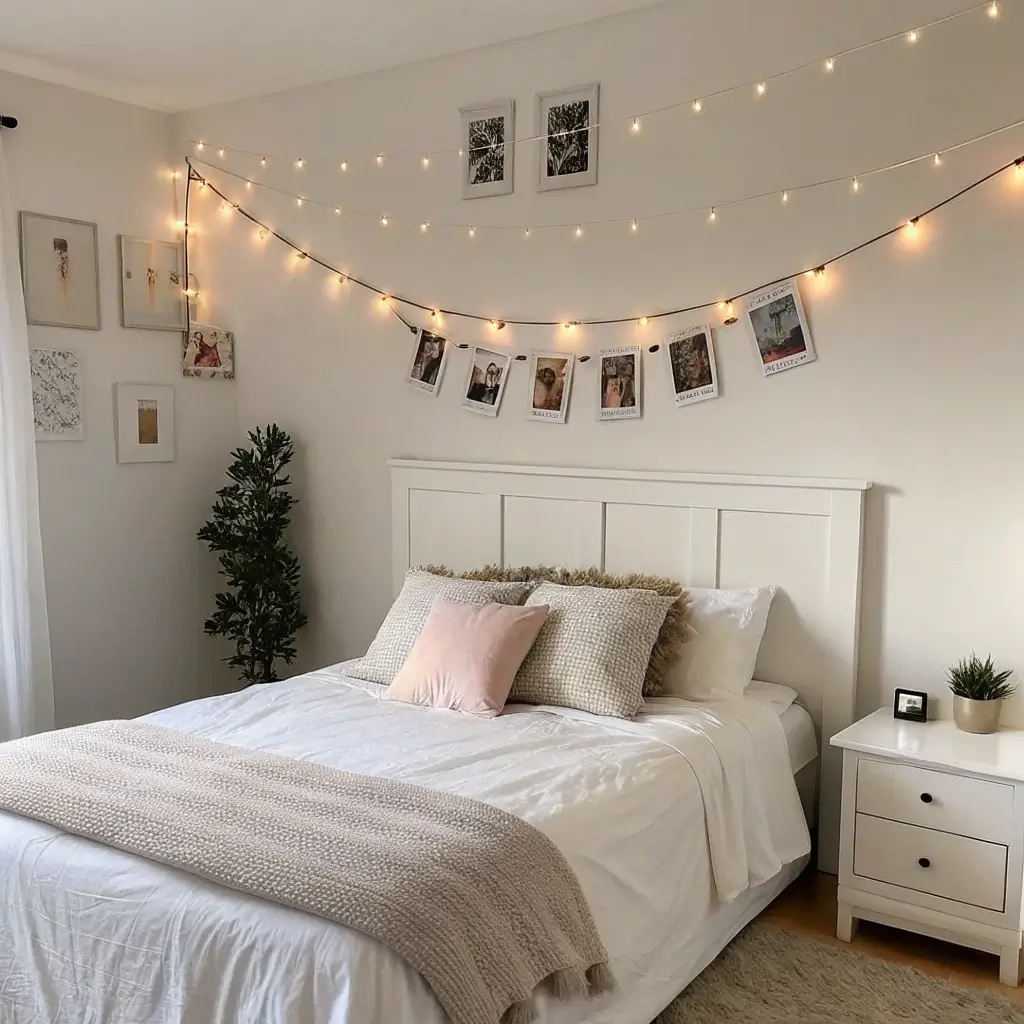
Bedroom Gallery Wall with Fairy Lights

Gallery walls are already a statement, but add fairy lights and you’ve got a whole mood. The lights draw attention to your carefully curated collection while adding that cozy, lived-in feeling that makes a space feel truly personal.
Illuminating Your Gallery Wall
There are several approaches to this:
- Border the entire gallery: Create a frame of lights around your whole collection
- Weave through the arrangement: Let lights trail between and around frames
- Highlight specific pieces: Direct lights toward your favorite artwork
- Use as connecting element: Drape lights between frames to unify the collection visually
Clip-style fairy lights are particularly useful here—you can actually use the clips to hold smaller photos directly, creating an integrated display where the lights are part of the gallery itself.
For gallery walls, I recommend micro LED fairy lights with thin wire. They’re less visually intrusive and don’t compete with your artwork for attention. The goal is for the lights to enhance your gallery, not overshadow it.
Mix up your gallery with a combination of framed art, photos, small mirrors, and decorative objects. The fairy lights will tie everything together and create cohesion even among very different elements.
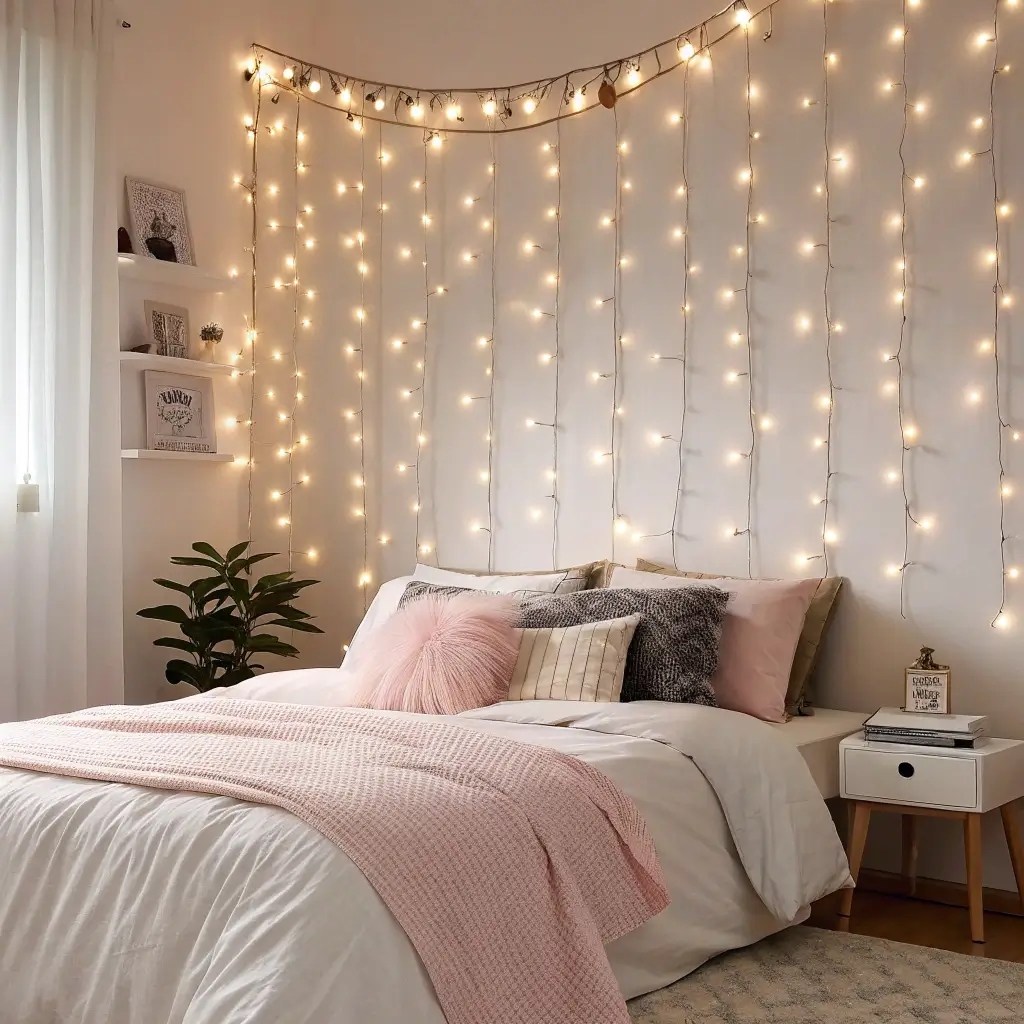
Twinkling Lights Behind Headboard
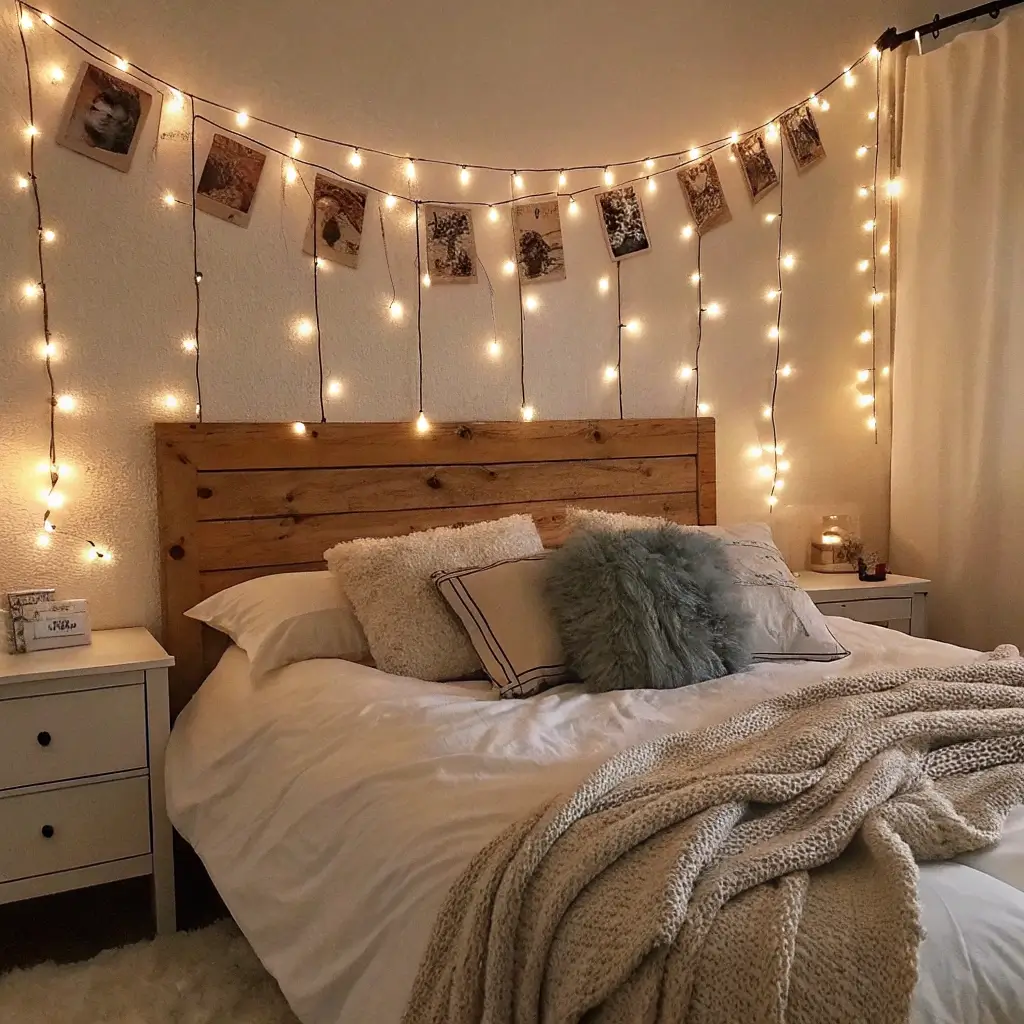
This subtle approach creates a gorgeous backlit effect that makes your headboard (and your whole bed area) look way more expensive than it probably is. Not that I’m judging—my headboard was $40 and looks great with this trick.
The glow behind your headboard creates depth and drama without being overwhelming. It’s like your bed has its own personal sunset happening 24/7.
Creating the Backlit Effect
Here’s how to nail this look:
- Solid headboards: Attach lights to the wall behind your headboard, positioning them so the glow radiates outward around the edges
- Open or slatted headboards: Weave lights through the open sections for visible twinkling
- Upholstered headboards: Place lights along the top edge so they spill upward onto the wall
- No headboard: Create a faux headboard effect by arranging lights in a rectangle on the wall behind your bed
Warm white lights are non-negotiable here. You want a soothing glow, not something that keeps you awake. Some people even use their behind-headboard lights as a nightlight—the glow is just enough to navigate if you need to get up, but not so bright it disturbs your sleep.
Consider putting these lights on a dimmer or choosing adjustable-brightness options. Being able to turn down the glow as you’re falling asleep is genuinely useful, not just a nice-to-have feature.
Also Read: 15 Modern Dark Bedroom Aesthetic Ideas to Elevate Your Home
Fairy Light Chandelier DIY
Ready for something a little more ambitious? A DIY fairy light chandelier creates a stunning focal point that looks expensive and custom but costs surprisingly little to make.
This project transforms basic fairy lights into a legitimate light fixture that can replace or supplement your existing ceiling light. It’s perfect for renters who can’t install permanent fixtures but want something more interesting than a basic dome light.
Creating Your Own Light Chandelier
Here are a few approaches:
- Hoop chandelier: Wrap lights around a large embroidery hoop, hang from ceiling
- Branch chandelier: Suspend a beautiful branch and weave lights throughout
- Basket chandelier: Use an inverted woven basket with lights inside
- Crystal combo: Combine fairy lights with hanging crystals for extra sparkle
- Multi-tier design: Use hoops of different sizes at varying heights
My favorite method uses three embroidery hoops of graduating sizes, hung at different heights from a central point. Wrap each hoop with fairy lights, then add hanging crystal drops or small decorative elements. The result looks like something from an actual design magazine.
Fair warning: this project requires some trial and error. Getting the proportions right and balancing everything takes patience. But once you nail it, you’ll have a conversation piece that everyone asks about.
Soft Pastel Fairy Light Bedroom Theme

Who says fairy lights have to be white? Colored fairy lights in soft pastel shades create a dreamy, whimsical atmosphere that feels like sleeping inside a cotton candy cloud.
This theme works particularly well in bedrooms with already soft, muted color palettes. Think blush pinks, lavender, mint green, or soft peach.
Building Your Pastel Paradise
Here’s how to approach this theme:
- Choose complementary colors: Pick pastel lights that coordinate with your existing bedding and decor
- Mix and match: Combine two or three pastel shades for depth without going rainbow
- Consider color-changing options: Some LED lights cycle through multiple pastel shades
- Balance with neutrals: Use pastel lights against white or cream backgrounds for best effect
Popular pastel combinations include:
- Soft pink and warm white
- Lavender and fairy pink
- Mint green and soft yellow
- Blush and peach tones
The key to pulling off colored lights without looking like a child’s bedroom is subtlety. Choose muted, sophisticated pastels rather than bright, saturated colors. And limit yourself to one or two accent colors—you’re going for “ethereal dreamscape,” not “disco party.”
I experimented with soft pink lights for about six months, and honestly? Loved it. The rosy glow made everything feel warmer and more romantic. Eventually I switched back to warm white, but I’d definitely do pastel lights again in the right space.
Hanging Plants with Integrated Fairy Lights
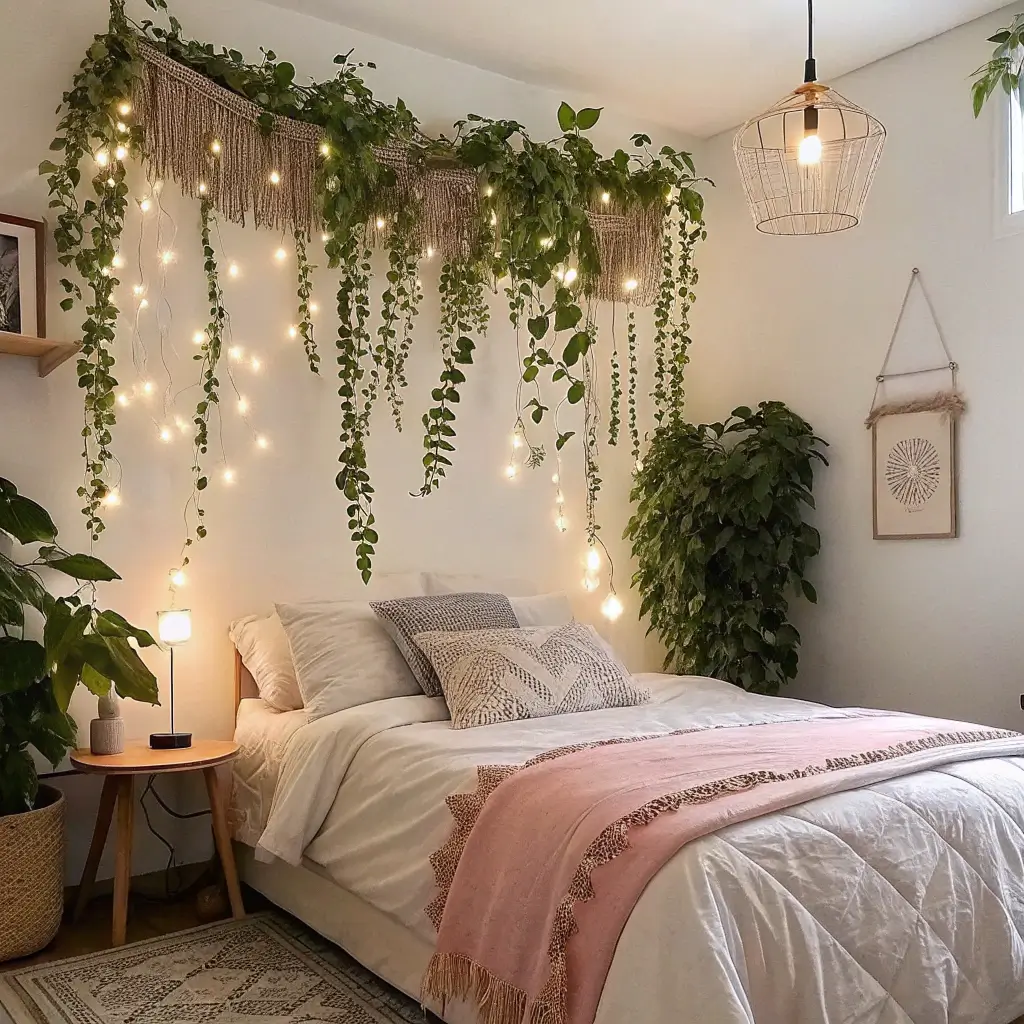
Last but definitely not least—combining fairy lights with hanging plants creates something truly magical. It’s like having your own enchanted garden right in your bedroom, without any of the maintenance of an actual garden.
This idea marries two major trends—indoor plants and fairy light decor—into one cohesive, absolutely gorgeous element.
Creating Your Indoor Garden Glow
Here’s how to bring this concept to life:
- Trailing plants work best: Pothos, string of pearls, English ivy, or string of hearts
- Weave lights through the vines: Let the lights follow the natural drape of the plant
- Mix real and faux: If keeping plants alive isn’t your strength, faux plants work great too
- Create clusters: Group several hanging plants with integrated lights for maximum impact
- Consider placement: Corners, above beds, or near windows work beautifully
Pro tip: Use battery-operated lights for hanging plant arrangements. It eliminates the need for trailing cords and makes the whole setup look cleaner and more intentional.
The combination of natural greenery and twinkling lights creates this incredibly organic, fairy-tale feeling. It’s especially magical at night when the lights create shadows through the leaves. I added lights to my pothos last spring, and it’s genuinely one of my favorite things in my entire apartment.
Final Thoughts on Your Fairy Light Journey
So there you have it—fifteen ways to transform your bedroom from ordinary to absolutely enchanting using nothing but fairy lights and a little creativity. Whether you go for the dramatic starry ceiling or keep it simple with a subtle behind-headboard glow, fairy lights have this incredible ability to make any space feel more intentional, more personal, and infinitely cozier.
The beauty of these ideas is their accessibility. You don’t need a massive budget, professional installation skills, or even your landlord’s permission for most of them. Just some fairy lights, a few basic supplies, and a willingness to experiment.
My biggest piece of advice? Start with one idea and see how it feels in your space. You can always add more later—trust me, you probably will. Fairy lights have a way of multiplying once you start. But there’s no need to transform your entire room overnight. Part of the fun is the gradual evolution, watching your space become more and more you over time.
And hey, if your first attempt doesn’t look exactly like the Pinterest photo? That’s totally fine. My fairy light canopy sagged hilariously for the first week until I figured out the right tension. My DIY chandelier fell down twice before I got the hanging mechanism right. The perfect room doesn’t happen instantly—it’s a process, and that process should be enjoyable.
So grab some fairy lights, put on your favorite playlist, and start creating your cozy bedroom sanctuary. Your future self—the one curled up in that beautifully lit space with a good book and a cup of tea—will thank you.
Now if you’ll excuse me, I just talked myself into buying another set of fairy lights. Again. 🙂